
- 분류 전체보기 (110)

| 일 | 월 | 화 | 수 | 목 | 금 | 토 |
|---|---|---|---|---|---|---|
| 1 | ||||||
| 2 | 3 | 4 | 5 | 6 | 7 | 8 |
| 9 | 10 | 11 | 12 | 13 | 14 | 15 |
| 16 | 17 | 18 | 19 | 20 | 21 | 22 |
| 23 | 24 | 25 | 26 | 27 | 28 | 29 |
| 30 | 31 |
- c#
- Linux
- AVR
- vscode
- yocto
- C++
- Visual Studio
- QEMU
- QT
- AArch64
- WPF
- STM32
- 아두이노
- yocto project
- 라즈베리파이
- bare metal
- MVVM
- UART
- Debug
- buildroot
- atmel
- Visual Studio Code
- Raspberry
- nucleo
- esp32
- avr-gcc
- 디버깅
- raspberrypi
- 리눅스
- Arduino
- Today
- Total
임베디드를 좋아하는 조금 특이한 개발자?
[Yocto Project] QT6 개발 - 5 : QT Creator로 원격 개발 본문
- 개발 환경
개발 보드 : Raspberrypi 4
WSL2 (Ubuntu 24.04 LTS)
Yocto Project : Scarthgap
- 소스 코드
https://github.com/MainForm/yocto_rpi4_qt6_template
GitHub - MainForm/yocto_rpi4_qt6_template
Contribute to MainForm/yocto_rpi4_qt6_template development by creating an account on GitHub.
github.com
- 이전 포스트
https://littlebitodd-developer.tistory.com/110
[Yocto Project] QT6 개발 - 4 : systemd 서비스로 부팅 후 자동 실행
- 개발 환경개발 보드 : Raspberrypi 4WSL2 (Ubuntu 24.04 LTS)Yocto Project : Scarthgap- 소스 코드https://github.com/MainForm/yocto_rpi4_qt6_template GitHub - MainForm/yocto_rpi4_qt6_templateContribute to MainForm/yocto_rpi4_qt6_template developme
littlebitodd-developer.tistory.com
1. 서론
이번 포스트까지 QT 애플리케이션을 이미지에 포함하여 배포하는 것까지 성공하였습니다. 하지만 실제 개발하는데 매번 이미지를 빌드하는 것은 시간이 오래걸리고 불필요한 작업으로 개발 시간이 늘어납니다. 또한 디버깅하기도 힘들다는 문제점이 있지만 QT Creator에서는 다행이도 IDE에서 Target Device에 원격으로 접근하여 디버깅 및 실행을 자동화하므로 개발하는데 매우 편하다는 장점이 있습니다. 그래서 이번 포스트에서는 QT Creator에서 Target Device에 ssh로 연결하고 디버깅까지 진행해보겠습니다.
2. 필요 패키지 설정
- rpi4-qt6-image.bb
SUMMARY = "Minimal Qt 6 image for Raspberry Pi 4"
DESCRIPTION = "A minimal bootable Raspberry Pi 4 image with the Qt 6 runtime"
LICENSE = "MIT"

inherit core-image populate_sdk_qt6_base

# Enable SSH so the board can be configured and debugged without a local console.
IMAGE_FEATURES:append = " ssh-server-openssh"

# Bootable base image plus the Qt 6 runtime libraries/plugins needed by target apps.
IMAGE_INSTALL:append = " \
    packagegroup-core-boot \
    packagegroup-qt6-essentials \
    qt6-hello-world \
"

# Qt 6 SDK support for building applications against this image.
TOOLCHAIN_HOST_TASK:append = " \
    nativesdk-packagegroup-qt6-toolchain-host-essentials \
"

# Basic network management, including Wi-Fi configuration via nmcli/wpa-supplicant.
IMAGE_INSTALL:append = " \
    networkmanager \
    networkmanager-nmcli \
    networkmanager-wifi \
    wpa-supplicant \
"

# Fontconfig plus Latin/monospace/Korean TrueType fonts for Qt text rendering.
IMAGE_INSTALL:append = " \
    fontconfig-utils \
    ttf-dejavu-sans \
    ttf-dejavu-sans-mono \
    source-han-sans-kr-fonts \
"

# Utilities required by Qt Creator for remote device operations and application deployment.
IMAGE_INSTALL:append = " \
    coreutils \
    rsync \
"

# Target-side components required for remote C++ and QML debugging with Qt Creator.
IMAGE_INSTALL:append = " \
    gdbserver \
    qtdeclarative-plugins \
"
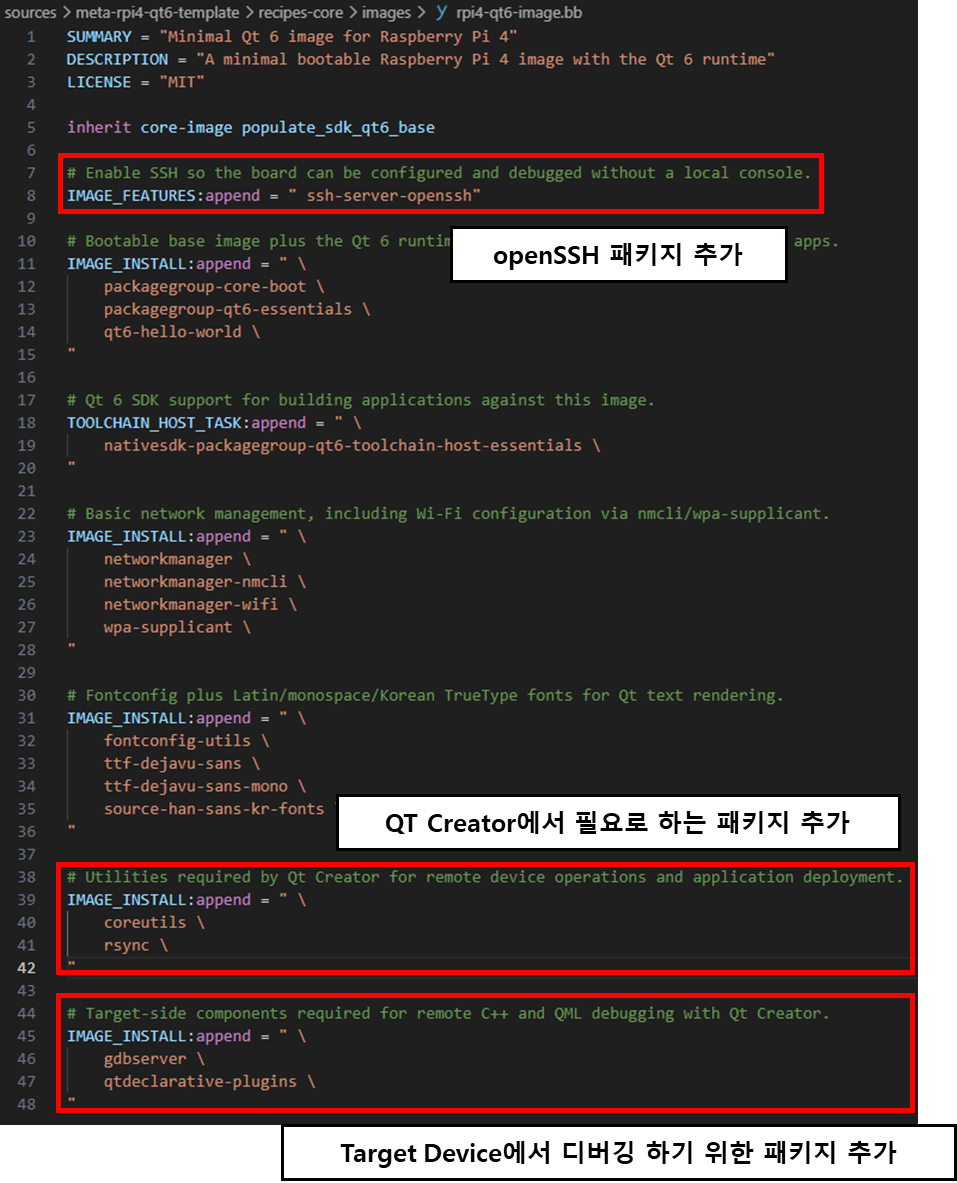
위 패키지를 추가한 다음 bitbake으로 이미지를 다시 빌드하시면 됩니다.
bitbake rpi4-qt6-image
3. 라즈베리파이 SSH 접속 확인
3.1. wifi 연결
# 현재 연결 가능한 WIFI SSID 확인
nmcli device wifi list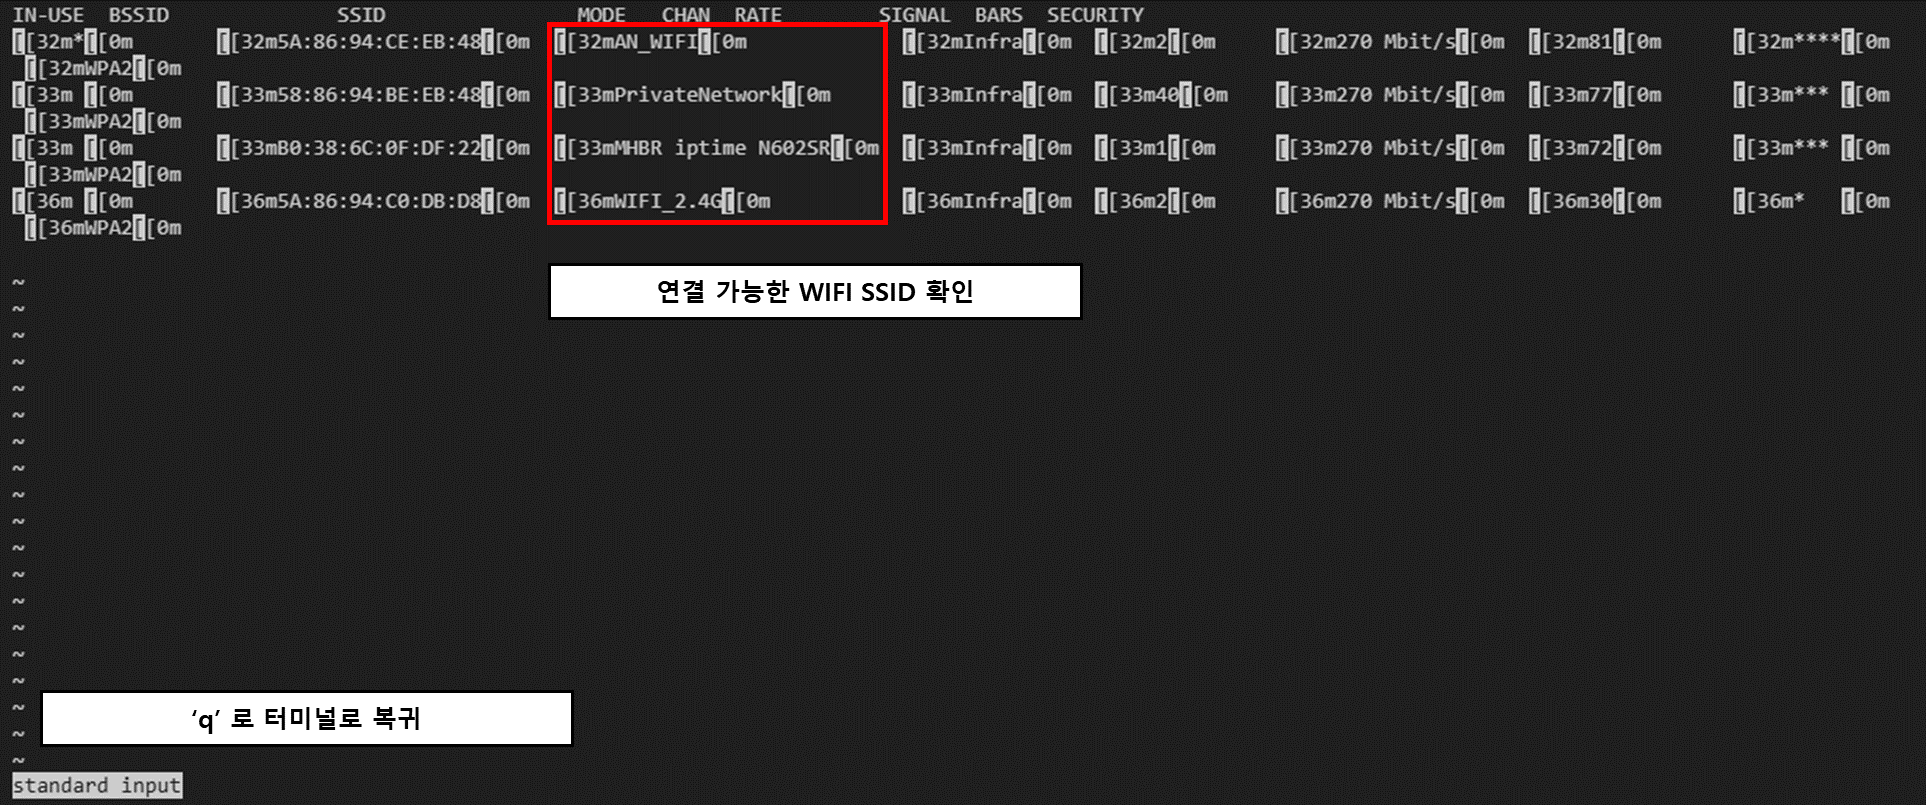
nmcli device wifi connect "SSID" password "0123456789"
※주의
제 개발환경에서는 연결된 공유기에서 IP가 자동 할당하도록 되어 있습니다.
그러므로 IP가 각 개발 환경 마다 다르므로 꼭 확인 해야합니다.
3.2. SSH 연결
# ssh로 Target Device 연결
# 반드시 IP 확인 필요
ssh root@192.168.0.15
4. QT Creator 설정
4.1. 호스트 디버거 설정
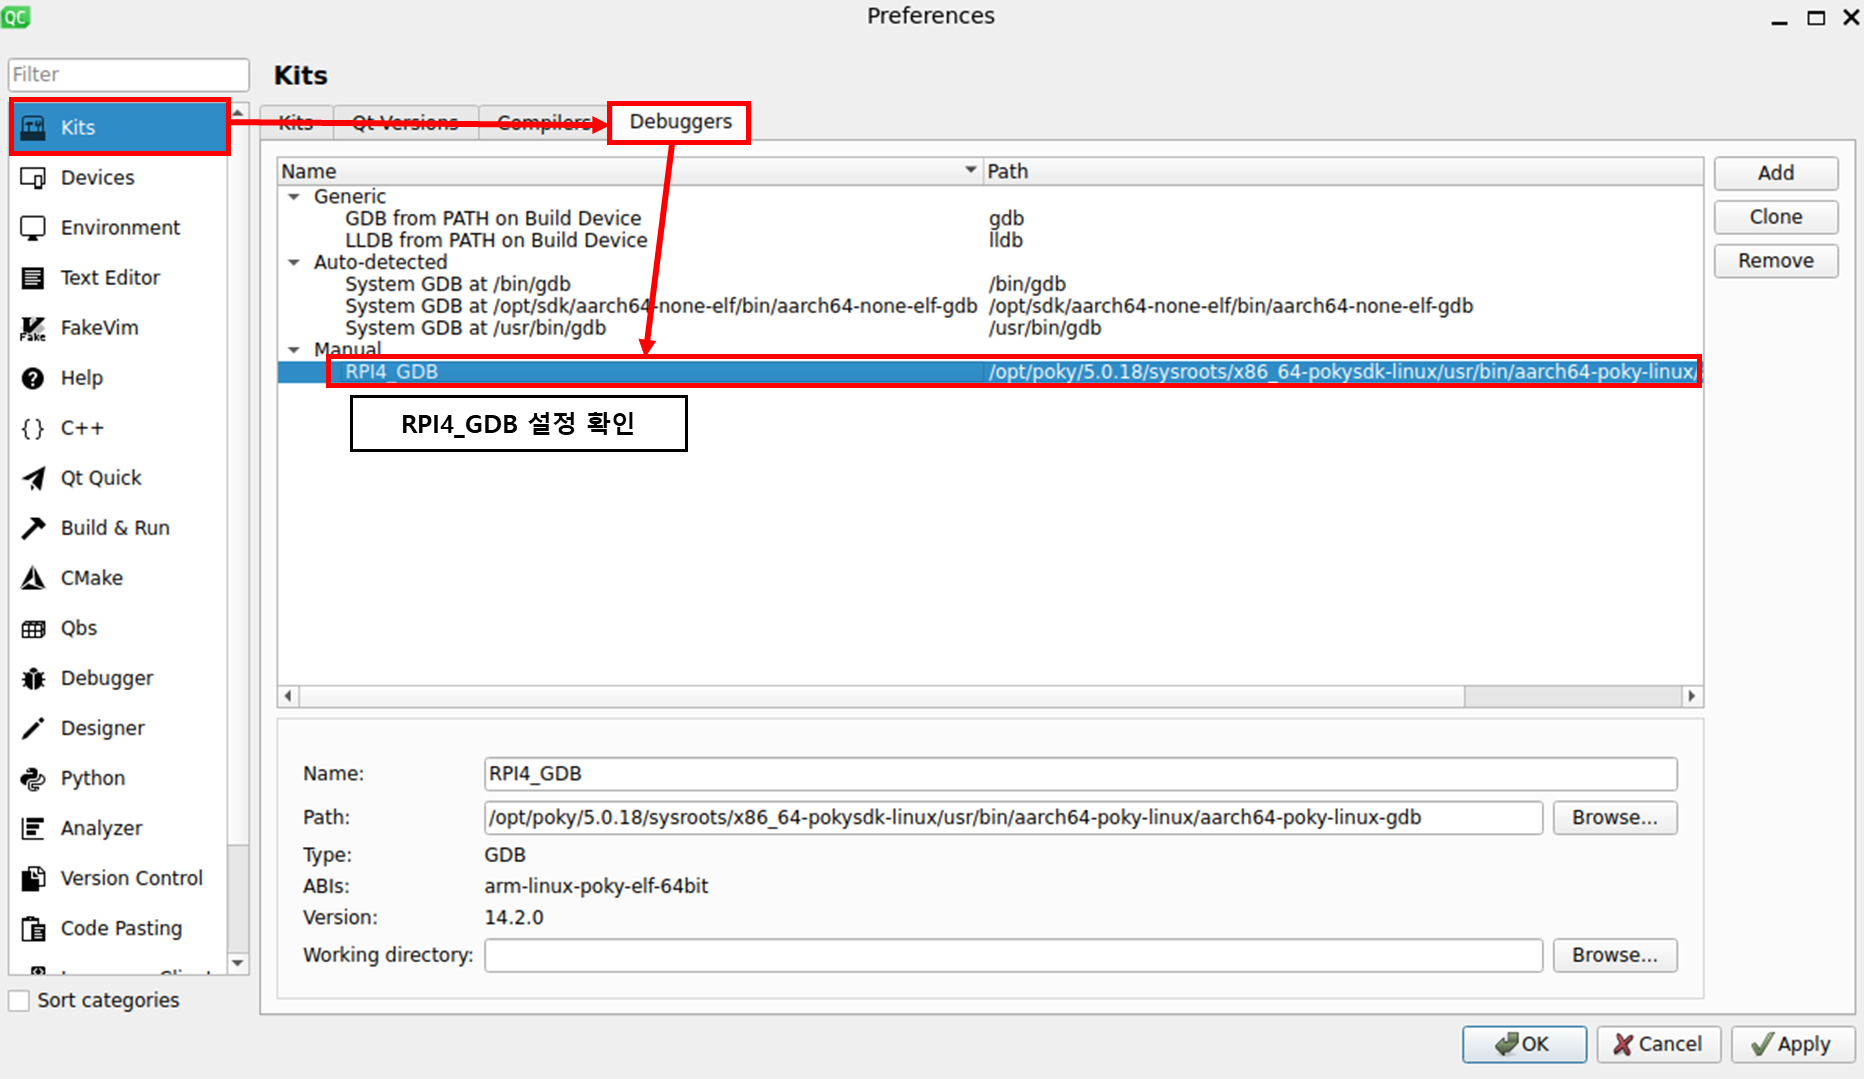

만약 위 처럼 GDB가 설정되어있지 않았다면 이전포스트에 "3.2. QT Creator 개발 환경 설정"을 참고하세요.
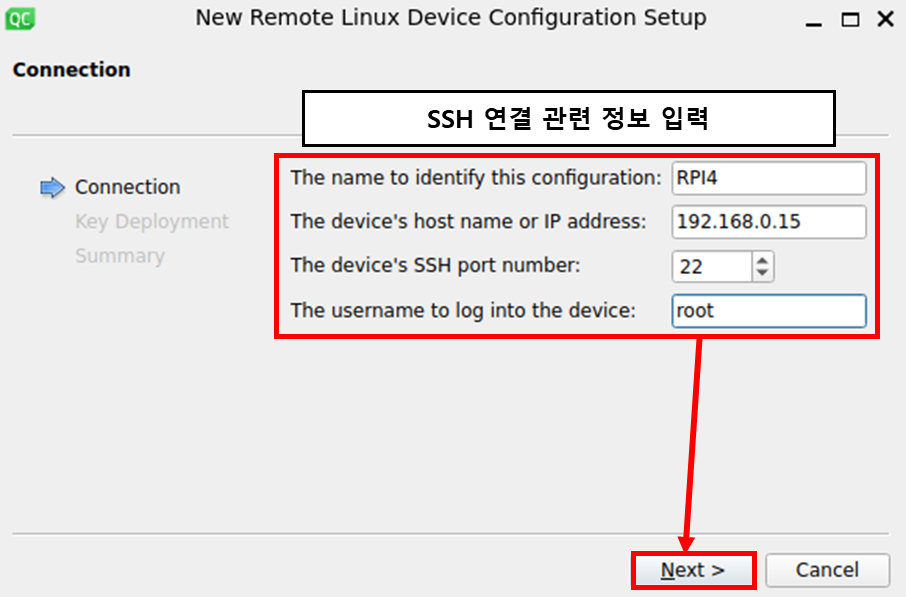
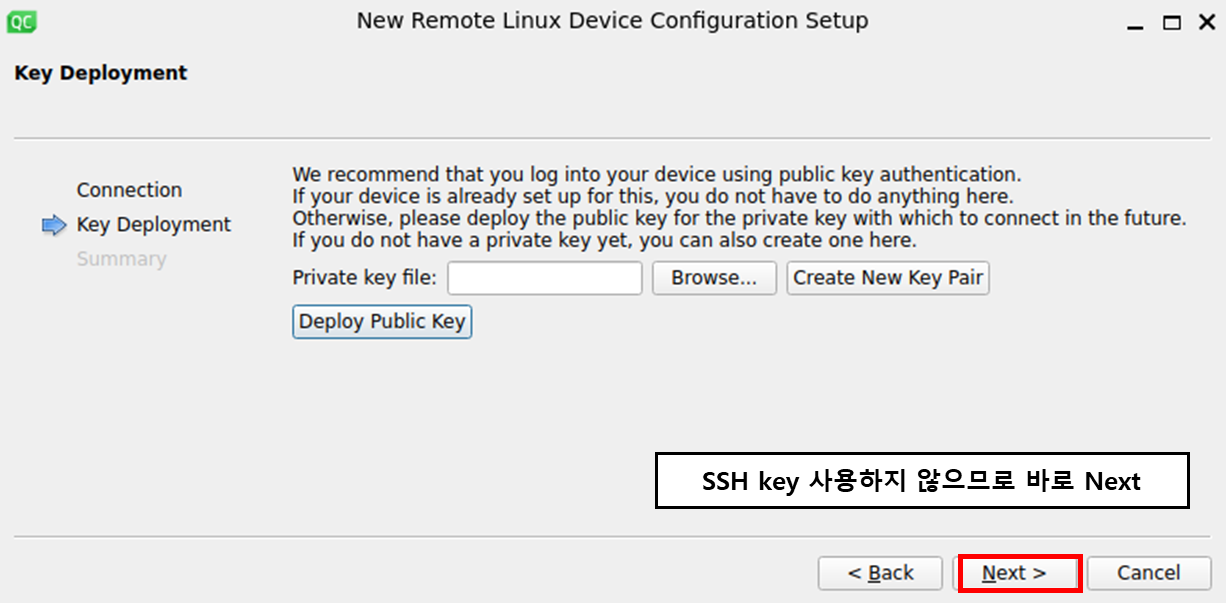
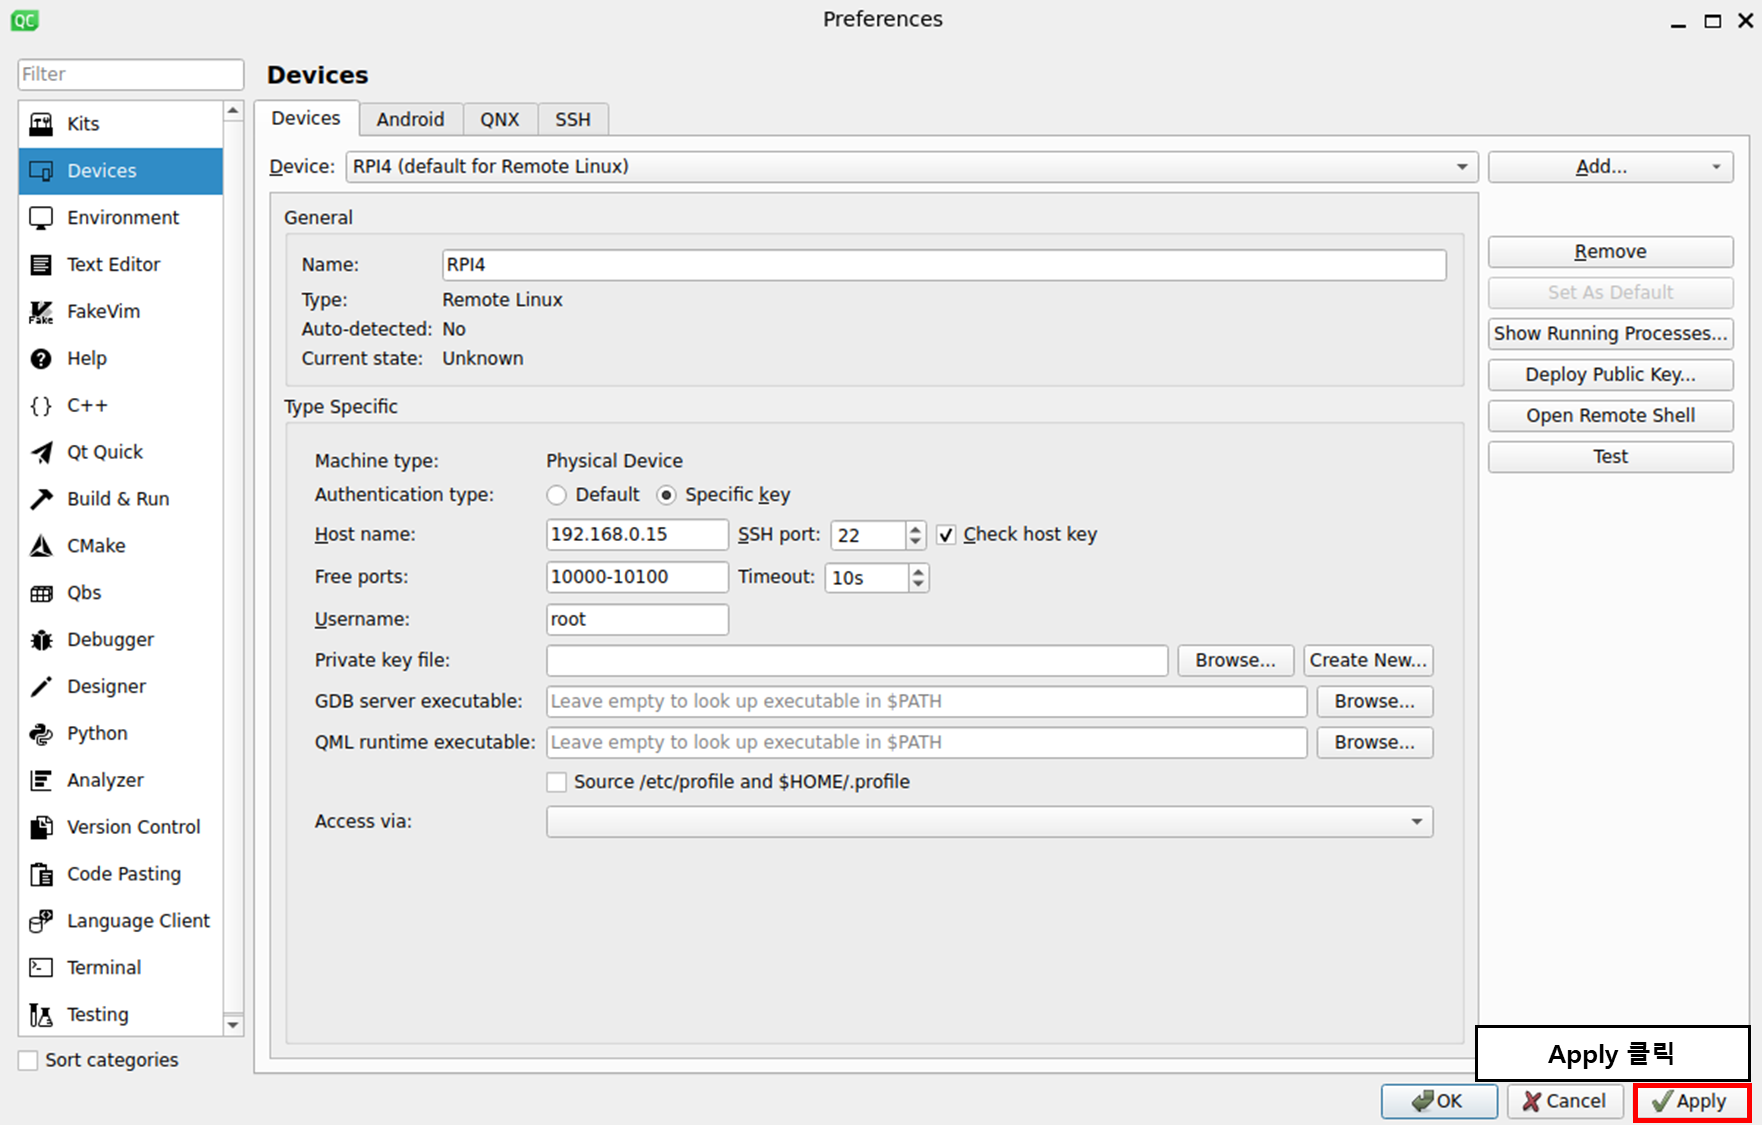
4.2. Remote Device 추가
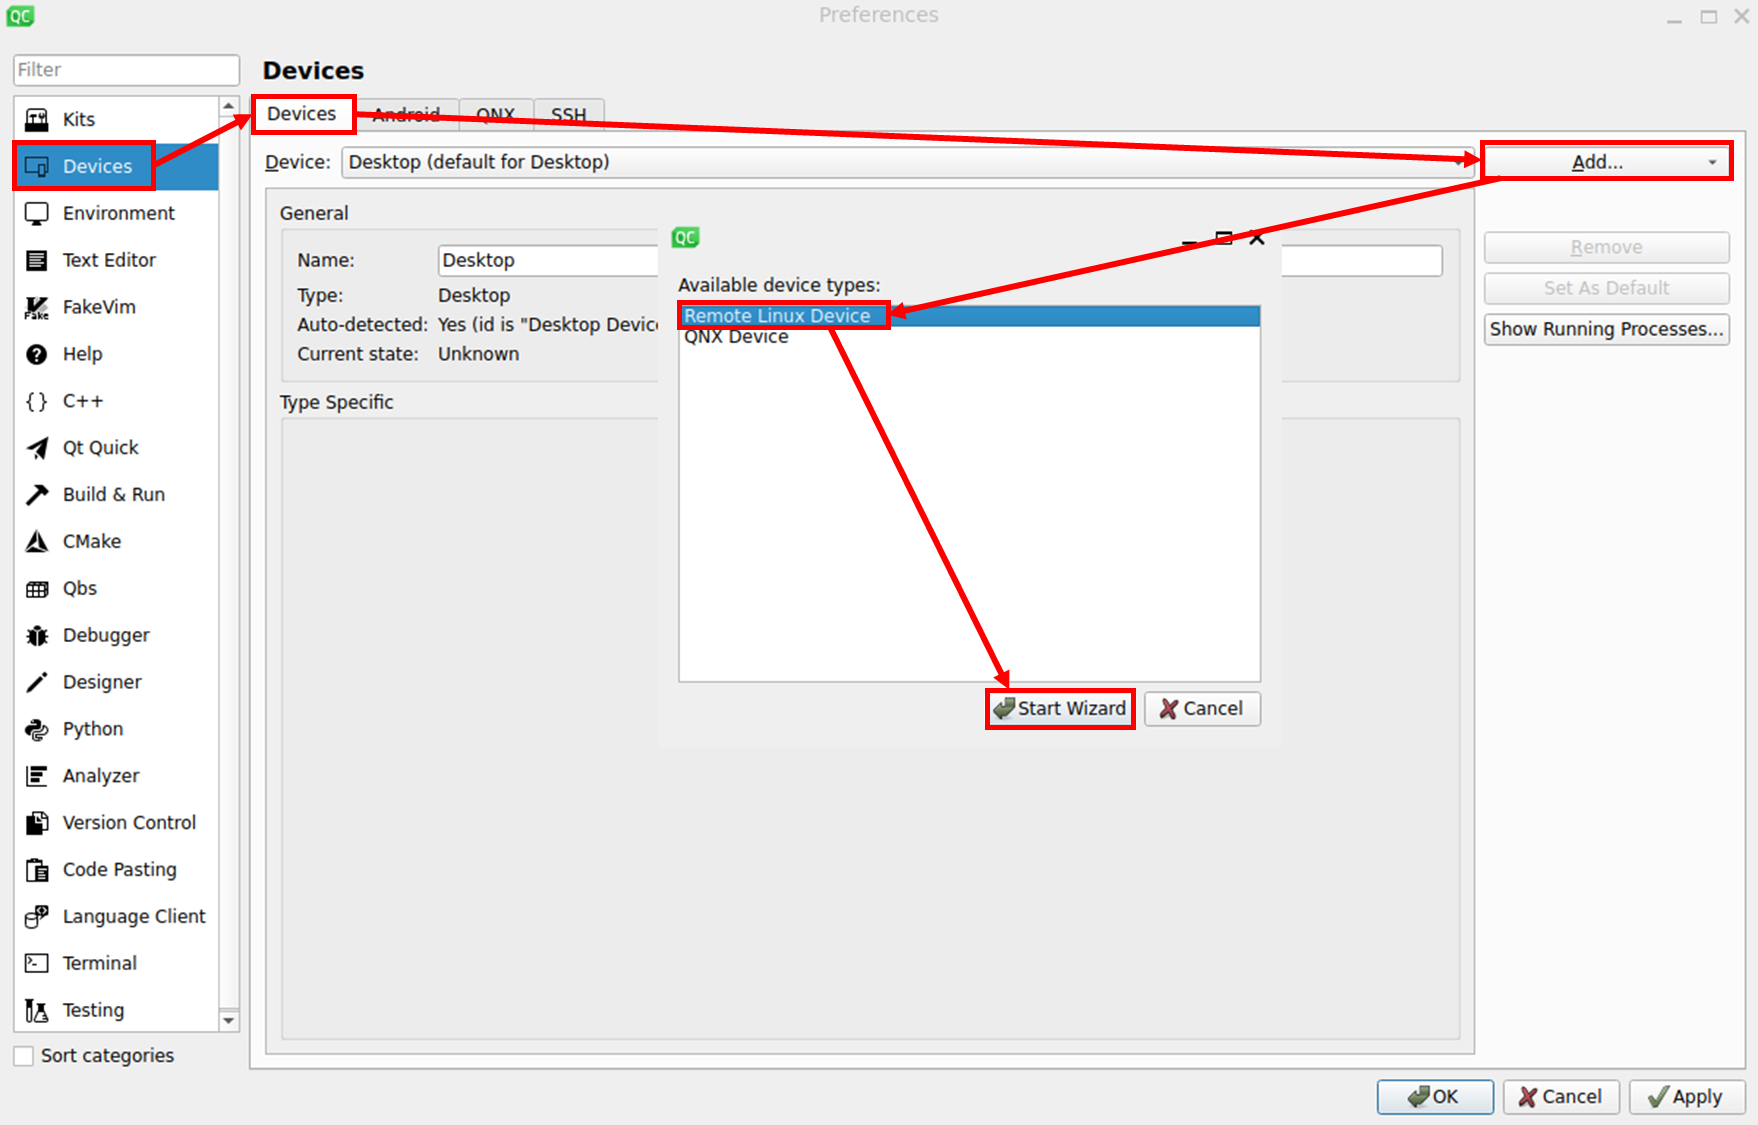



5. QT Creator 프로젝트 설정

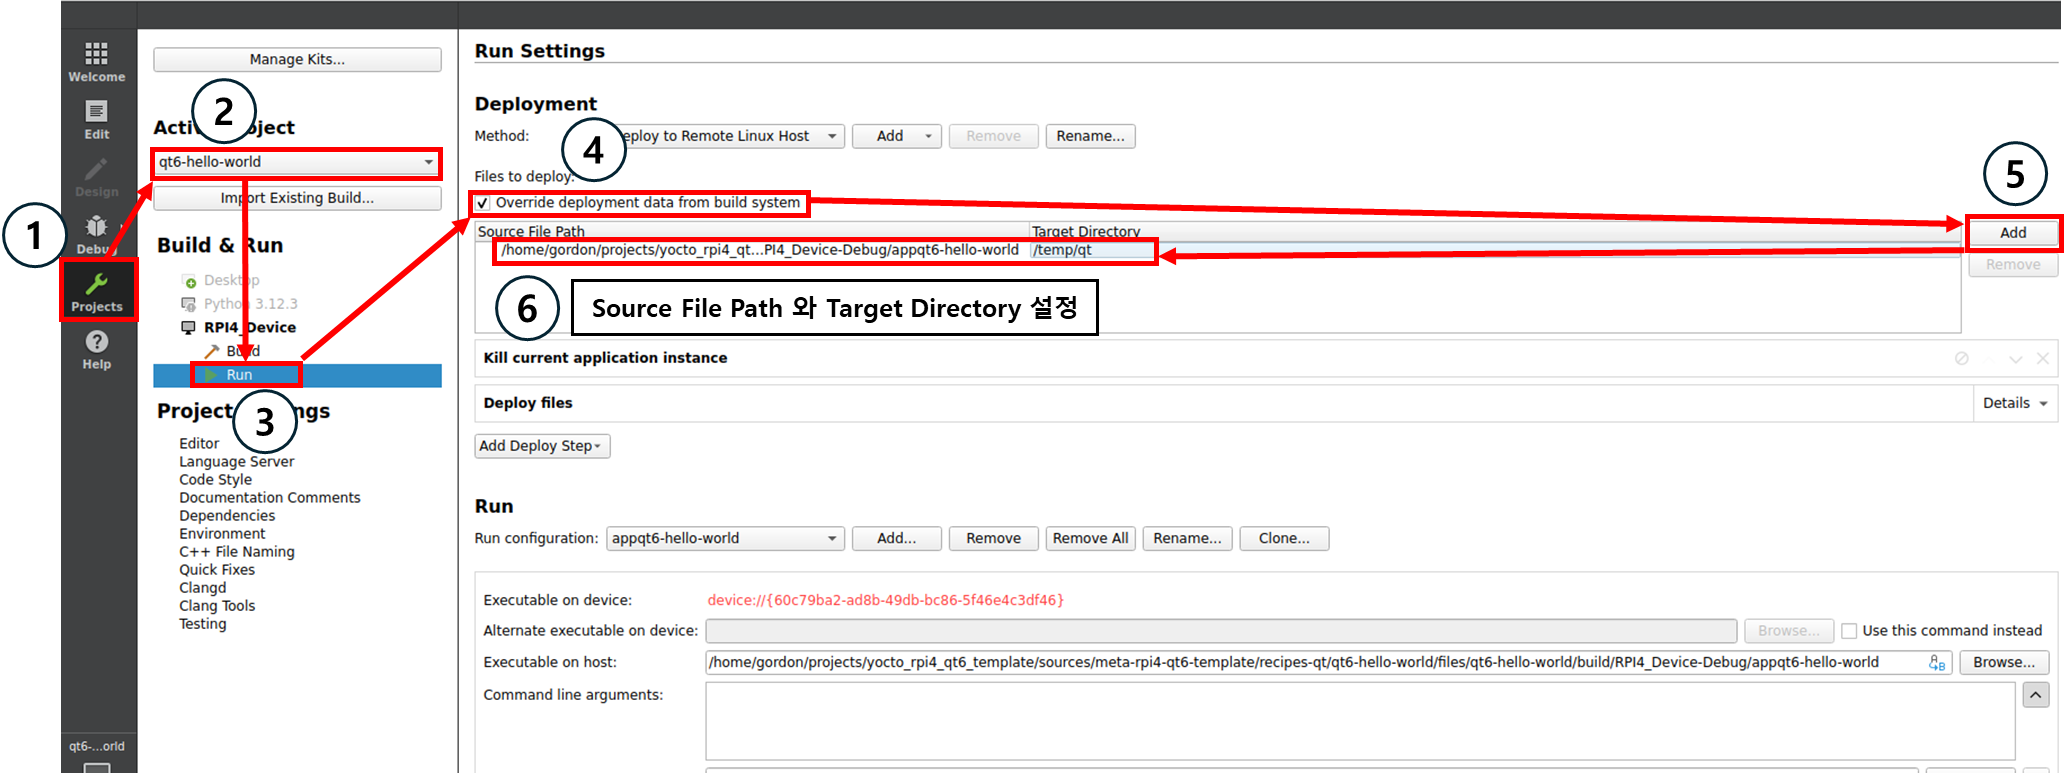
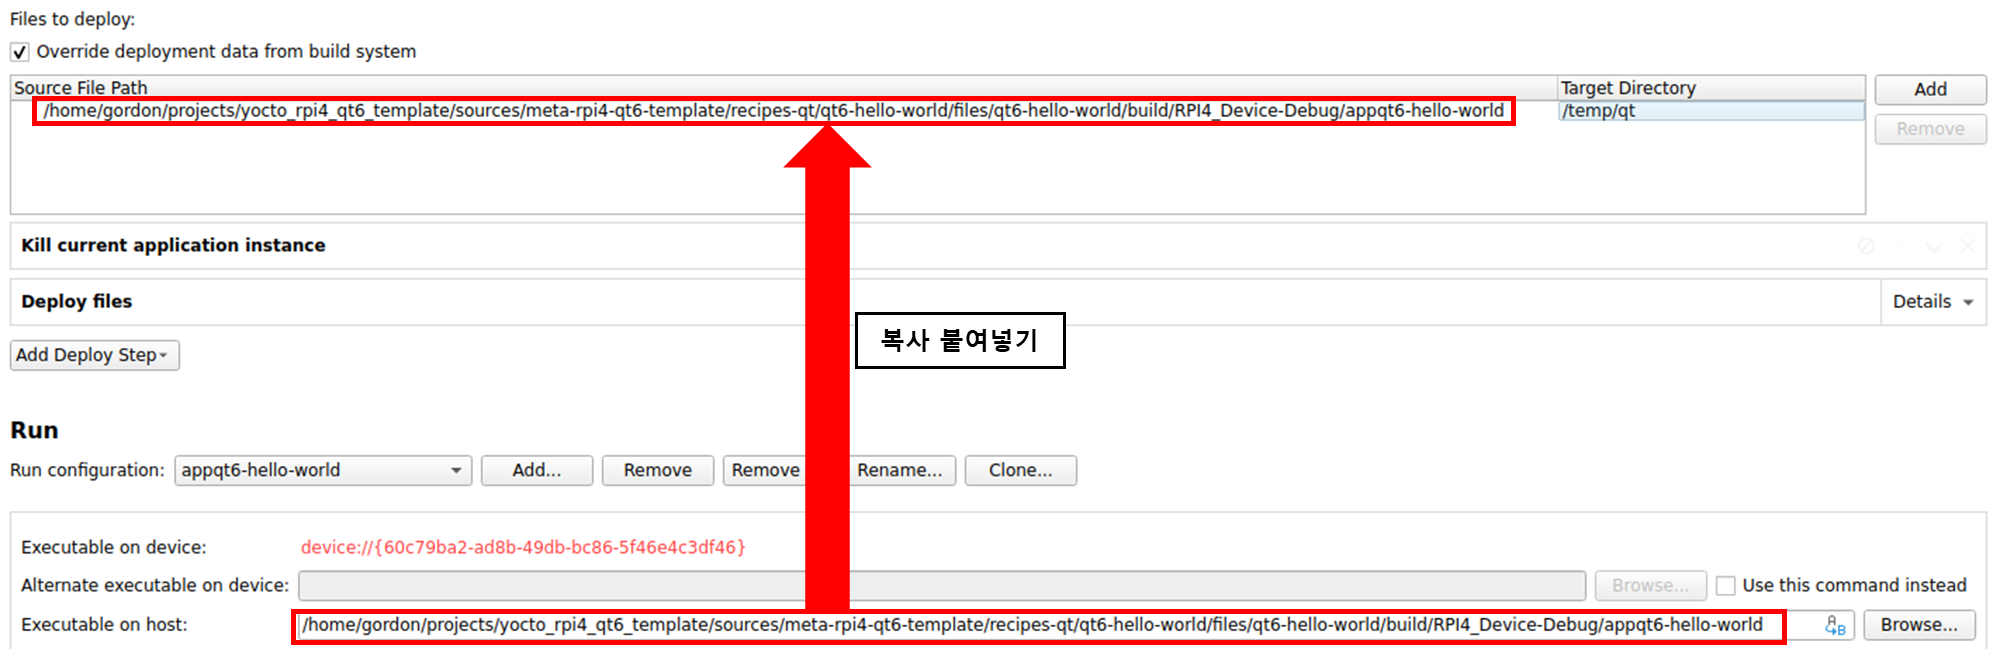
해당 설정은 Source File Path는 빌드로 생성된 프로그램 위치를 의미합니다.
Target Directory는 Source File Path가 실제로 Target Device에서 어디에 복사될지 정하는 설정입니다.

6. 애플리케이션 Deploy
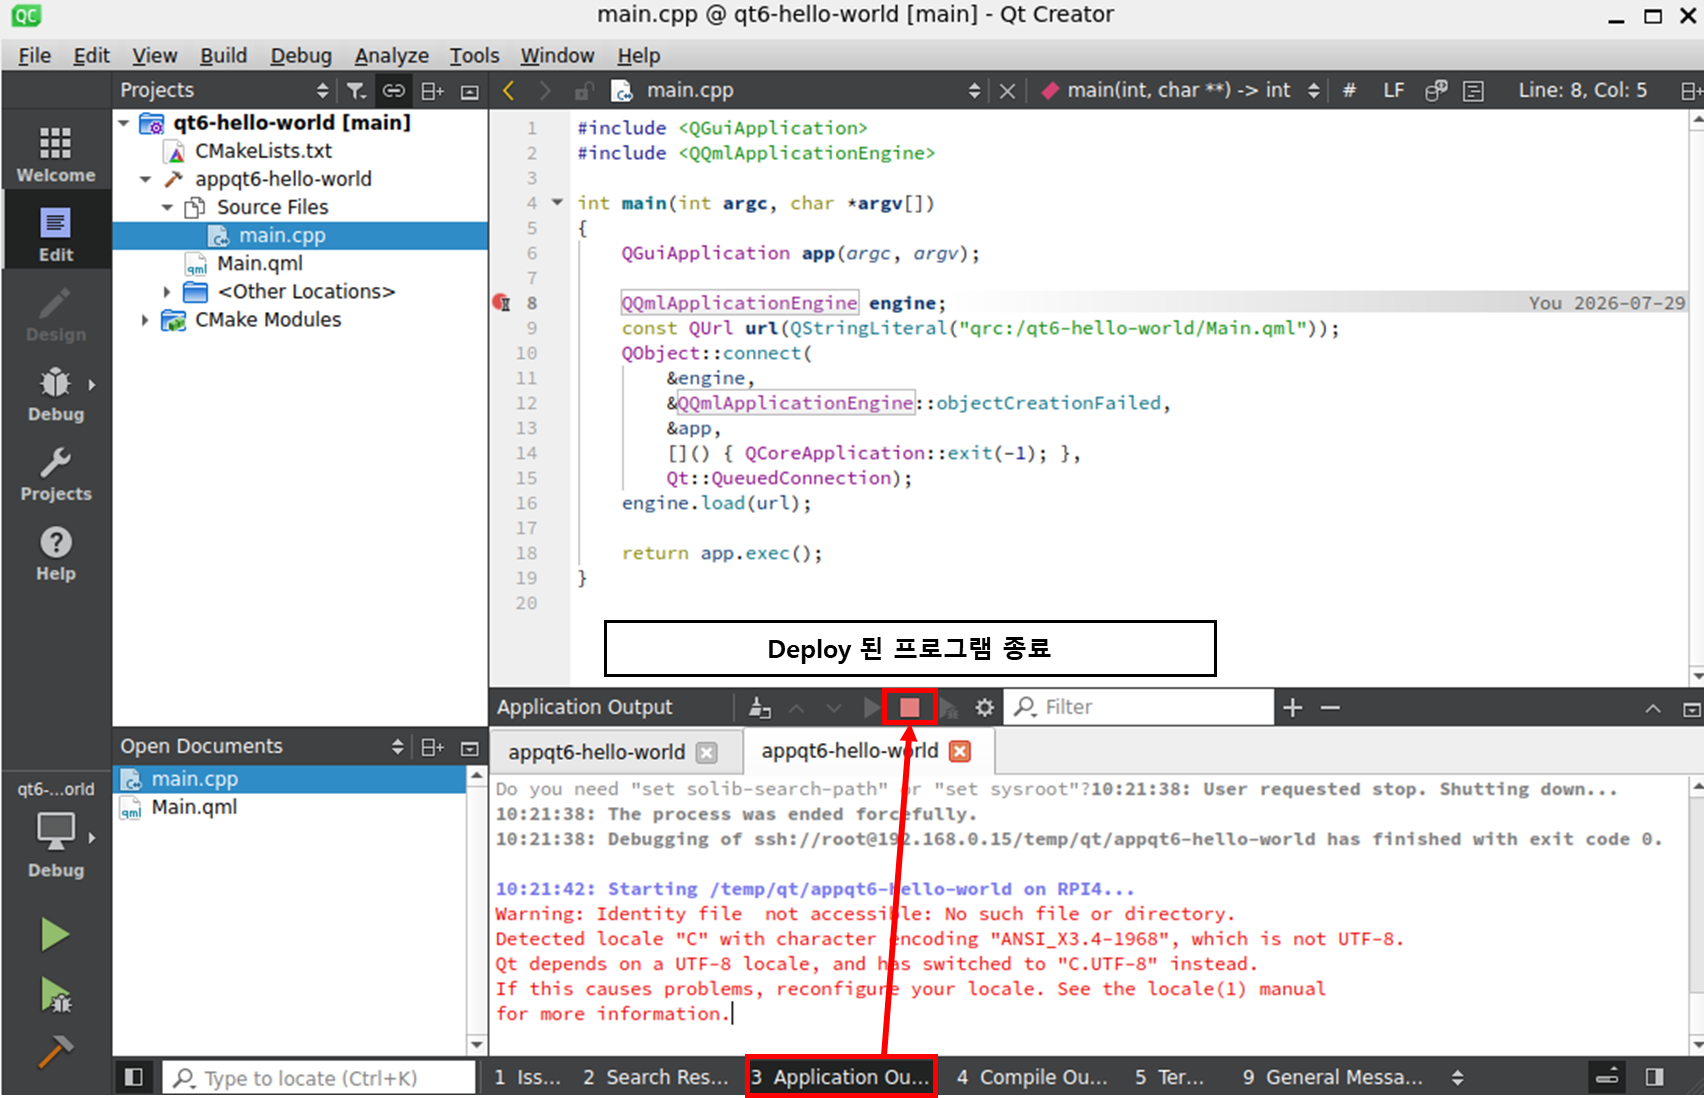
먼저 Deploy 하기전에 기존에 실행하고 있던 QT 애플리케이션을 종료하여야 합니다.
# 기존에 실행되고 있는 QT 애플리케이션 종료
systemctl stop qt6-hello-world

# 재부팅 하더라도 QT 애플리케이션 중단
systemctl disable qt6-hello-world

7. 애플리케이션 디버깅


'Embedded > Yocto Project' 카테고리의 다른 글
| [Yocto Project] QT6 개발 - 4 : systemd 서비스로 부팅 후 자동 실행 (0) | 2026.07.29 |
|---|---|
| [Yocto Project] QT6 개발 - 3 : QT 애플리케이션 레시피 작성 (0) | 2026.07.29 |
| [Yocto Project] QT6 개발 - 2 : QT Creator 개발 환경 구성 (0) | 2026.07.27 |
| [Yocto Project] QT6 개발 - 1 : 개발 환경 구축 (0) | 2026.07.23 |
| [Yocto Project] KAS를 통한 개발 환경 자동 구성 (0) | 2026.06.17 |