
| 일 | 월 | 화 | 수 | 목 | 금 | 토 |
|---|---|---|---|---|---|---|
| 1 | 2 | 3 | 4 | |||
| 5 | 6 | 7 | 8 | 9 | 10 | 11 |
| 12 | 13 | 14 | 15 | 16 | 17 | 18 |
| 19 | 20 | 21 | 22 | 23 | 24 | 25 |
| 26 | 27 | 28 | 29 | 30 | 31 |
- 회로
- yocto
- Debug
- UART
- nucleo
- Visual Studio
- AArch64
- Linux
- 라즈베리파이
- AVR
- atmel
- MVVM
- STM32
- avr-gcc
- C++
- Raspberry
- QEMU
- bare metal
- Debugging
- WPF
- Arduino
- 아두이노
- c#
- vscode
- buildroot
- esp32
- GPIO
- 디버깅
- Visual Studio Code
- raspberrypi
- Today
- Total
임베디드를 좋아하는 조금 특이한 개발자?
[Yocto Project] KAS를 통한 개발 환경 자동 구성 본문
- 개발 환경
개발 보드 : Raspberrypi 4
WSL2 (Ubuntu 22.04 LTS)
Yocto Project : Scarthgap
- 소스 코드
https://github.com/MainForm/yocto_rpi4_with_kas_template
GitHub - MainForm/yocto_rpi4_with_kas_template
Contribute to MainForm/yocto_rpi4_with_kas_template development by creating an account on GitHub.
github.com
1. 서론
Yocto Project를 사용하다보면 명령어가 너무 많아 답답하고 개발 환경을 구축하는데 큰 어려움을 격는 분들이 많습니다. 레이어 구성하는 파일(bblayers.conf)과 설정 파일(local.conf)가 따로 있어 프로젝트의 전체 구성을 한번에 파악하는 것이 힘들고, git으로 submodule로 관리시 git 구성이 복잡해지는 문제가 발생 하는 것이 싫어하는 사람이 있습니다. 이런 개발자들을 위해 docker compose 처럼 간단한 파일 하나로 전체 프로젝트 구성을 나타내며 명령어 하나로 이미지 빌드까지 자동화 해주는 것이 kas 도구 입니다.
- kas를 사용하는 이유
- 개발 환경을 docker compose 처럼 파일 하나로 구성 (manifest 형식)
- git으로 배포 및 형상 관리시 submodule 미사용
- 귀찮은 yocto project 개발 환경 설정을 통일
- kas를 사용하기에 어려운 환경
- kas yml 파일에서 지원하지 않는 환경 (Petalinux Tools, AMD EDF 등)
- 개발 환경이 자주 변경되는 경우
kas를 사용지 않고 git submodule 로 형상 관리하는 방법에 대한 포스트는 다음과 같습니다.
https://littlebitodd-developer.tistory.com/102
[Yocto Project] Github 배포하기 위한 프로젝트 구성
- 개발 환경개발 보드 : Raspberrypi 4WSL2 (Ubuntu 22.04 LTS)Yocto Project : Scarthgap - 소스 코드https://github.com/MainForm/yocto_rpi4_template GitHub - MainForm/yocto_rpi4_templateContribute to MainForm/yocto_rpi4_template development by creat
littlebitodd-developer.tistory.com
만약 Git을 사용하지 않으실 거라면 3번으로 넘어가도 상관 없습니다.
2. Git 초기화 (선택)
# git 초기화
git init

# git ignore 파일 생성
touch .gitignore
- git ignore 파일
### Visual studio code ###
.vscode
.codex
.agents

### Yocto ###
build*
sources
여기서 중요한 것은 layer나 config 파일들을 전부 git에서 제외 하는 것입니다. 왜냐하면, 우리는 kas yml로 개발 환경을 자동 구성 할 것이기에 kas yml로 생성된 파일을 git에 포함한 경우 문제가 발생할 수 있습니다.
3. kas 설치 및 yml 파일 작성
3.1. kas 설치
# pipx 설치
sudo apt update
sudo apt install pipx

# kas 설치
pipx install kas

# kas 버전 확인
kas --version
참고 문서 : https://kas.readthedocs.io/en/latest/userguide/getting-started.html
Getting Started — kas 5.3 documentation
© Copyright Siemens and contributors, 2017-2025.
kas.readthedocs.io
3.2. yml 파일 작성
참고 문서 : https://kas.readthedocs.io/en/latest/userguide/project-configuration.html
Project Configuration — kas 5.3 documentation
Provides variables to define which buildtools version should be fetched and where it is (or will be) installed. Both version and sha256sum should be set. The environment variable KAS_BUILDTOOLS_DIR can be used to set the directory where buildtools will be
kas.readthedocs.io
# 라즈베리파이4를 위한 kas yml 파일 생성
touch kas-rpi4.yml
- kas-rpi4.yml 파일
header:
  version: 11

repos:
  poky:
    url: https://git.yoctoproject.org/poky
    branch: scarthgap
    path: sources/poky
    layers:
      meta:
      meta-poky:
      meta-yocto-bsp:

  meta-openembedded:
    url: https://github.com/openembedded/meta-openembedded.git
    branch: scarthgap
    path: sources/meta-openembedded
    layers:
      meta-oe:
      meta-python:
      meta-networking:
      meta-multimedia:

  meta-raspberrypi:
    url: https://git.yoctoproject.org/meta-raspberrypi
    branch: scarthgap
    path: sources/meta-raspberrypi
    layers:
      .:

machine: raspberrypi4-64
distro: poky

target:
  - core-image-base

local_conf_header:
  base: |
    CONF_VERSION = "2"

  rpi4: |
    ENABLE_UART = "1"
    GPU_MEM = "64"

  image: |
    IMAGE_FSTYPES += "wic.bz2"

  licenses: |
    LICENSE_FLAGS_ACCEPTED += "synaptics-killswitch"
3.2.1. header 구성
header:
  version: 11
version은 yml 파일에 대한 최소 포멧 버전(Configuration Format Changes)을 의미합니다.
https://kas.readthedocs.io/en/4.4/format-changelog.html
Configuration Format Changes — kas 4.4 documentation
© Copyright Siemens AG, 2017-2024. Revision 37f84335.
kas.readthedocs.io
3.2.2. repos 구성
repos:
  poky:
    url: https://git.yoctoproject.org/poky
    branch: scarthgap
    path: sources/poky
    layers:
      meta:
      meta-poky:
      meta-yocto-bsp:

  meta-openembedded:
    url: https://github.com/openembedded/meta-openembedded.git
    branch: scarthgap
    path: sources/meta-openembedded
    layers:
      meta-oe:
      meta-python:
      meta-networking:
      meta-multimedia:

  meta-raspberrypi:
    url: https://git.yoctoproject.org/meta-raspberrypi
    branch: scarthgap
    path: sources/meta-raspberrypi
    layers:
      .:
repos 는 bitbake에서 Layer를 어떻게 구성할지를 정하는 부분입니다. 여기에는 각 소스코드를 어떻게 다운 받을 것이며 해당 소스 코드 내에서 어떤 레이어를 추가할지를 명명하게 되어있습니다.
- url
url은 git 소스코드를 다운 받은 repository URL 주소를 의미합니다.
- branch
branch는 git으로 clone한 repository를 어떤 branch로 checkout할지를 의미합니다.
주의점)
말 그대로 해당 브렌치로 checkout하는 것이므로 해당 branch의 HEAD가 달라진 다면 다른 commit을 clone 할 수 있습니다.
그러므로 이러한 상황을 방지하고자 commit ID를 지정할 수 있습니다.
- path
path는 clone할 git repository를 어디에 다운 받을 지를 정합니다.
- layers
layers는 clone한 repository에서 어떤 layer를 추가할지 명시합니다.
단, 따로 명시되어 있지 않는다면 자기 자신을 layer로 추가합니다.
그래서 명시적으로 자기 자신을 추가한 다고 명시하는 것이 좋습니다.
예) meta-raspberrypi 자기 자신을 layer로 추가함
  meta-raspberrypi:
    url: https://git.yoctoproject.org/meta-raspberrypi
    branch: scarthgap
    path: sources/meta-raspberrypi
    layers:
      .:
3.2.3. machine 구성
machine: raspberrypi4-64
타겟 개발 보드를 명시합니다.
우리 개발 환경에서는 meta-rapberrypi에 "raspberrypi4-64.conf" 가 있으므로 명시 가능합니다.
3.2.4. distro 구성
distro: poky
빌드할 Linux의 distribution 명을 지정합니다.
3.2.5. target 구성
target:
  - core-image-base
빌드할 Recipe를 명시합니다.
core-image-base는 Poky에서 기본적으로 제공해주는 image recipe 입니다.
https://github.com/yoctoproject/poky/blob/scarthgap/meta/recipes-core/images/core-image-base.bb
poky/meta/recipes-core/images/core-image-base.bb at scarthgap · yoctoproject/poky
Mirror of https://git.yoctoproject.org/poky/. Contribute to yoctoproject/poky development by creating an account on GitHub.
github.com
만약 자기 만의 image recipe이 있다면 변경 가능합니다.
3.2.6. local_conf_header 구성
local_conf_header:
  base: |
    CONF_VERSION = "2"

  rpi4: |
    ENABLE_UART = "1"
    GPU_MEM = "64"

  image: |
    IMAGE_FSTYPES += "wic.bz2"

  licenses: |
    LICENSE_FLAGS_ACCEPTED += "synaptics-killswitch"
local_conf_header는 말 그대로 local.conf에 작성할 내용을 명시하는 구간입니다.
저의 경우 예시로 4개의 구간으로 나누어 명시하였습니다.
위 내용을 바탕으로 생성된 local.conf 내용은 아래와 같습니다.
# base
CONF_VERSION = "2"

# image
IMAGE_FSTYPES += "wic.bz2"

# licenses
LICENSE_FLAGS_ACCEPTED += "synaptics-killswitch"
# rpi4
ENABLE_UART = "1"
GPU_MEM = "64"

MACHINE ??= "raspberrypi4-64"
DISTRO ??= "poky"
BBMULTICONFIG ?= ""
4. kas yml으로 이미지 빌드
kas build kas-rpi4.yml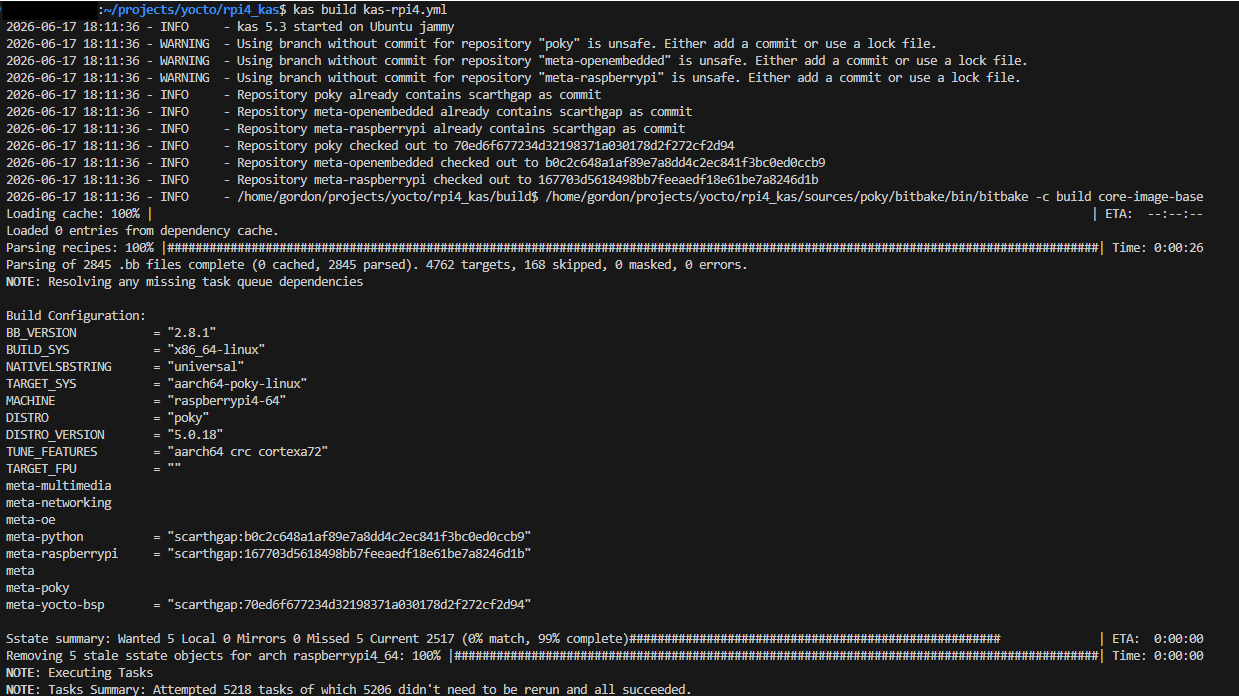
'Embedded > Yocto Project' 카테고리의 다른 글
| [Yocto Project] Github 배포하기 위한 프로젝트 구성 (0) | 2026.06.16 |
|---|---|
| [Yocto Project] QT5 예제 실행하기 (0) | 2025.04.10 |
| [Yocto Project] Linux kernel module 개발 (0) | 2025.04.08 |
| [Yocto Project] networkmanager를 통해 wifi 연결 (0) | 2025.04.01 |
| [Yocto Project] 라즈베리파이 WIFI 연결 (0) | 2025.03.31 |


