| 일 | 월 | 화 | 수 | 목 | 금 | 토 |
|---|---|---|---|---|---|---|
| 1 | 2 | 3 | 4 | 5 | 6 | 7 |
| 8 | 9 | 10 | 11 | 12 | 13 | 14 |
| 15 | 16 | 17 | 18 | 19 | 20 | 21 |
| 22 | 23 | 24 | 25 | 26 | 27 | 28 |
- GPIO
- vscode
- Raspberry
- bare metal
- Debug
- Linux
- 리눅스
- 아두이노
- Visual Studio
- 회로
- avr-gcc
- STM32
- AArch64
- c#
- AVR
- atmel
- nucleo
- UART
- QEMU
- WPF
- 디버깅
- buildroot
- C++
- esp32
- Visual Studio Code
- Debugging
- raspberrypi
- Arduino
- yocto
- 라즈베리파이
- Today
- Total
임베디드를 좋아하는 조금 특이한 개발자?
torchvision.models에 있는 MobileNet V3 사용법 본문
pyTorch 라이브러리에는 이미 사용할 수 있는 딥러닝 모델이 있습니다. 그 중에 가볍고 실시간으로 사용할만한 모델 중 하나인 MobileNet V3를 사용하는 방법에 대해서 소개 하도록 하겠습니다.
먼저 라이브러리를 import를 하도록 하겠습니다.
import torch					# 파이토치
from torchvision import transforms		# 전처리 하기 위한 transfrom
import torchvision.models as models		# MobileNet V3이 포함되어 있는 models를 import
from PIL import Image				# 추론할 이미지를 읽어오기위한 Image를 import
그리고 MobileNet를 사용하기 앞서 GPU를 사용하기 위한 cuda 설정과 입력 이미지를 MobileNet에 추론하기전에 전처리하기위한 설정을 하도록 합니다. 입력 이미지는 PIL라이브러리로 열기 때문에 먼저 MobileNet에 입력 형태에 맞추기 위해 Tensor로 바꿉니다. 그리고 사진의 데이터가 0~255의 범위로 되어 있기에 Normalize를 하여 데이터의 값을 맞춥니다.
# 전처리 설정
preprocess = transforms.Compose([
    transforms.ToTensor(),
    transforms.Normalize(mean=[0.485, 0.456, 0.406], std=[0.229, 0.224, 0.225]),
])

# Cuda를 사용할 수 있다면 Cuda, 아니면 CPU
DEVICE = torch.device('cuda' if torch.cuda.is_available() else 'cpu')
MobileNet 모델을 만들기 위해서는 먼저 가중치를 설정해야 합니다. pyTorch에는 MobileNet를 미리 ImageNet에 대한 Dataset에 대해 미리 학습되어 있습니다. 그리고 MobileNet V3은 small과 large중에 small를 사용하였습니다.
    # 미리 ImageNet에 대해 학습 된 가중치
    weight = models.MobileNet_V3_Small_Weights.IMAGENET1K_V1
    # 학습된 가중치로 모델 생성
    model = models.mobilenet_v3_small(weight).to(DEVICE)
    model.eval()
모델을 사용할 준비는 끝 마쳤습니다. 이제 입력할 데이터를 준비 해보록 하겠습니다. 순서는 다음과 같습니다.
- PIL 라이브러리 중 Image를 사용하여 이미지를 읽습니다.
- 전처리를 통해 입력이미지를 Tensor의 객체로 바꿉니다.
- Tensor의 shape를 모델(MobileNet)에 맞춥니다.
MobileNet에 데이터를 입력하기 위해서는 [Batch size x Channel x Height x Width] 모양으로 맞추어야 합니다. 입력 데이터는 1개이므로 Batch size는 1이고 RGB 이미지 이기에 Channel은 3입니다. Height와 Width는 적어도 224이상이어야 합니다.
    # 1.
    input_image_name = input('이미지 파일 : ')
    input_image = Image.open(input_image_name)
    # 2.
    input_tensor = preprocess(input_image)
    # 3.
    input_batch = input_tensor.unsqueeze(0).to(DEVICE)
훈련할 것이 아니기에 no_grad() 함수를 통해 자동적으로 gradient를 계산하지 않도록 합니다. 그리고 모델을 통해 나오는 출력의 모양은 [Batch size x Class size] 여기서 ImageNet은 1000개의 클래스를 가지고 있고 입력 데이터의 Batch size는 1이므로 모양은 [1 x 1000]입니다. 여기서 나온 출력 데이터는 아직 확률이 아니기에 softmax 함수를 통해 확률로 바꿉니다. 그리고 가장 확률이 높은 Index를 구하기 위해 argmax함수를 사용합니다.
    with torch.no_grad():
        output = model(input_batch)

        # 정답 확인 : https://deeplearning.cms.waikato.ac.nz/user-guide/class-maps/IMAGENET/
        probabilities = torch.nn.functional.softmax(output[0], dim=0)
        print(torch.argmax(probabilities))
전체 코드
import torch
from torchvision import transforms
import torchvision.models as models
from PIL import Image

# 전처리
preprocess = transforms.Compose([
    transforms.ToTensor(),
    transforms.Normalize(mean=[0.485, 0.456, 0.406], std=[0.229, 0.224, 0.225]),
])

DEVICE = torch.device('cuda' if torch.cuda.is_available() else 'cpu')

def main():
    # ImageNet으로 학습된 weight
    weight = models.MobileNet_V3_Small_Weights.IMAGENET1K_V1
    model = models.mobilenet_v3_small(weight).to(DEVICE)
    model.eval()

    input_image_name = input('이미지 파일 : ')
    input_image = Image.open(input_image_name)
    input_tensor = preprocess(input_image)
    input_batch = input_tensor.unsqueeze(0).to(DEVICE)

    with torch.no_grad():
        output = model(input_batch)

        # 정답 확인 : https://deeplearning.cms.waikato.ac.nz/user-guide/class-maps/IMAGENET/
        probabilities = torch.nn.functional.softmax(output[0], dim=0)
        print(torch.argmax(probabilities))

if __name__ == '__main__':
    main()
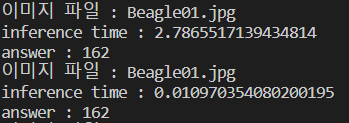
실제로 비글의 이미지로 추론한 결과 입니다.

https://deeplearning.cms.waikato.ac.nz/user-guide/class-maps/IMAGENET/
IMAGENET 1000 Class List - WekaDeeplearning4j
319 dragonfly, darning needle, devil's darning needle, sewing needle, snake fder, snake doctor, mosquito hawk, skeeter hawk", 412 ashcan, trash can, garbage can, wastebin, ash bin, ash-bin, ashbin, dustb, trash barrel, trash bin', 480 cash machine, cash di
deeplearning.cms.waikato.ac.nz
위 페이지에서 실제로 ImageNet의 결과를 확인 해보면 162에 비글이 있는 것을 알 수 있습니다.
하지만 추론 시간이 3.35초로 매우 느린 것을 볼 수 있습니다. 이건 cuda를 사용할 시 처음 메모리에 올리는데 시간이 오래 걸리기에 처음은 느립니다.

2번째 추론 시간이 10ms 인 것으로 매우 빠르다는 것을 확인 할 수 있습니다.(저는 노트북으로 GTX1650 MaxQ이기에 GPU에 따라 실행 속도가 다를 수 있습니다.)
16.6ms 가 60Hz라는 것을 생각했을 때 실시간을 충분히 사용 가능한 모델이라는 것을 알 수 있습니다.
'DeepLearning > pyTorch' 카테고리의 다른 글
| pytorch를 통한 xor 게이트 학습 (0) | 2022.08.27 |
|---|

