| 일 | 월 | 화 | 수 | 목 | 금 | 토 |
|---|---|---|---|---|---|---|
| 1 | 2 | 3 | 4 | 5 | 6 | 7 |
| 8 | 9 | 10 | 11 | 12 | 13 | 14 |
| 15 | 16 | 17 | 18 | 19 | 20 | 21 |
| 22 | 23 | 24 | 25 | 26 | 27 | 28 |
- AArch64
- Linux
- esp32
- Debugging
- buildroot
- 라즈베리파이
- yocto
- vscode
- 회로
- AVR
- C++
- nucleo
- Visual Studio
- raspberrypi
- Arduino
- bare metal
- c#
- Raspberry
- WPF
- atmel
- QEMU
- avr-gcc
- 디버깅
- Visual Studio Code
- 리눅스
- GPIO
- 아두이노
- STM32
- Debug
- UART
- Today
- Total
임베디드를 좋아하는 조금 특이한 개발자?
[Buildroot] Buildroot와 독립적인 개발 환경 구축 본문
- 개발 환경
개발 보드 : Raspberrypi 4
WSL2 (Ubuntu 22.04 LTS)
buildroot(2024.02)
1. 서론
Buildroot를 이용하여 개발하다 보면 buildroot 내 이미 개발보드나 패키지들이 많이 정의 되어 있어 추가적인 개발보드나 패키지를 추가하는 것은 프로젝트 관리만 힘들어 질 뿐입니다. 그래서, 실질적으로 buildroot와 개발 환경을 독립시켜 개발하는 것이 좋은 선택지가 될 수 있습니다. 또한, 그렇게 프로젝트들이 개발되고 있습니다.(batocera.linux 와 LVGL 보면 buildroot 밖에서 개발보드나 패키지를 개발하는 것을 확인할 수 있음)
그렇기 때문에 공식 문서를 참고 해 나가면서 개발 환경을 구성하도록 하겠습니다.
https://buildroot.org/downloads/manual/manual.html#outside-br-custom
The Buildroot user manual
Package imagemagick installs the following scripts: $(STAGING_DIR)/usr/bin/{Magick,Magick++,MagickCore,MagickWand,Wand}-config So it’s fixup would be: IMAGEMAGICK_CONFIG_SCRIPTS = \ Magick-config Magick++-config \ MagickCore-config MagickWand-config Wand
buildroot.org
2. 프로젝트 구성
# 프로젝트 폴더 생성 및 이동
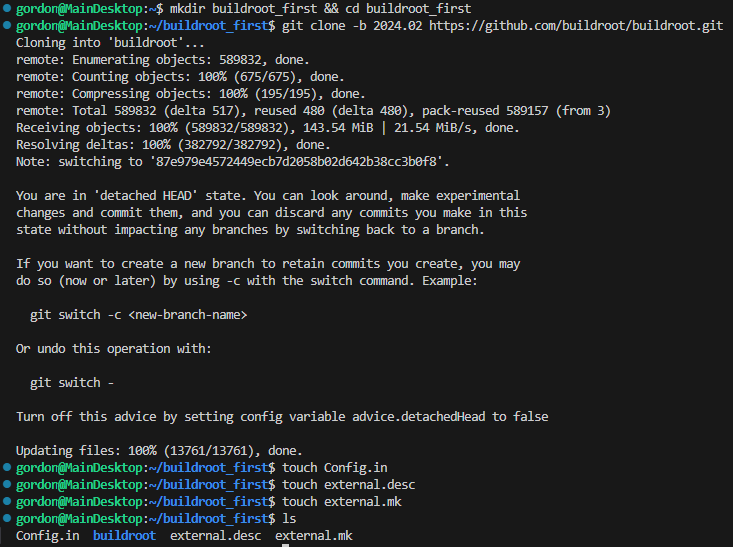
mkdir buildroot_first && cd buildroot_first

# buildroot(2024.02) 가져오기
git clone -b 2024.02 https://github.com/buildroot/buildroot.git

# 외부 개발 환경 설정을 위한 파일 생성
touch Config.in
touch external.desc
touch external.mk
먼저 프로젝트 폴더를 생성후 이동합니다. 그리고 buildroot를 가져옵니다. 앞으로 개발하면서 buildroot 안에서 파일을 수정 및 추가 하지 않을 것입니다. 그리고 외부 개발 환경 설정을 위한 파일 3개(Config.in, external.desc, external.mk)를 생성합니다.

external.desc 내 아래 내용을 추가합니다.
name: BUILDROOT_FIRST
desc: test

3. output 폴더 생성
이제 buildroot를 통해 output 폴더를 생성하여 Linux 빌드나 관련 설정을 변결 할 수 있도록 하겠습니다.
# buildroot로 이동
cd buildroot

# output폴더에 makefile를 생성
make O=../output BR2_EXTERNAL=.. outputmakefile
위 명령어를 통해 output폴더가 생성되었고 그 안에 Makefile이 생성되었습니다.
해당 Makefile를 통해 Buildroot를 사용할 수 있습니다.
4. 라즈베리파이용 리눅스 빌드
# output 폴더로 이동
cd ../output

# 라즈베리파이4 보드 설정
make raspberrypi4_64_defconfig

# 리눅스 빌드
make
5. 결론
추가적인 보드 추가 및 패키지 추가에 대한 내용은 다음에 포스트에 이어서 설명하도록 하겠습니다.
'Embedded > Buildroot' 카테고리의 다른 글
| [Buildroot] Helloworld 어플리케이션 개발 (rootfs overlay 방법) (3) | 2025.08.07 |
|---|---|
| [Buildroot] LVGL 개발을 위한 환경 구축 (1) | 2025.07.09 |
| [Buildroot] Raspberrypi에서 DRM 설정 (0) | 2025.07.05 |
| buildroot 빌드시 PATH 애러 해결 (0) | 2025.03.04 |
| Buildroot를 이용하여 Custom Linux 빌드 (Beaglebone, Raspberrypi 용) (0) | 2025.03.04 |


