
| 일 | 월 | 화 | 수 | 목 | 금 | 토 |
|---|---|---|---|---|---|---|
| 1 | 2 | 3 | 4 | |||
| 5 | 6 | 7 | 8 | 9 | 10 | 11 |
| 12 | 13 | 14 | 15 | 16 | 17 | 18 |
| 19 | 20 | 21 | 22 | 23 | 24 | 25 |
| 26 | 27 | 28 | 29 | 30 | 31 |
- Arduino
- vscode
- avr-gcc
- c#
- UART
- GPIO
- bare metal
- yocto
- QEMU
- STM32
- 디버깅
- MVVM
- Visual Studio
- esp32
- C++
- Linux
- Raspberry
- raspberrypi
- 아두이노
- atmel
- buildroot
- AVR
- WPF
- AArch64
- Debugging
- Debug
- 라즈베리파이
- 회로
- Visual Studio Code
- nucleo
- Today
- Total
임베디드를 좋아하는 조금 특이한 개발자?
[RaspberyPI4] JTAG(FT232H)로 Linux 커널 디버깅 - 1 (필요 환경 준비) 본문
[RaspberyPI4] JTAG(FT232H)로 Linux 커널 디버깅 - 1 (필요 환경 준비)
Gordon_ 2026. 6. 20. 01:58- 개발 환경
WSL2 : Ubuntu 24.04 LTS
buildroot : 2024.02
target board : RaspberryPI 4
openocd : 0.12.0
중요)
되도록이면 Ubuntu 24.04 를 사용해야합니다. 22.04에서 openocd 설치시 0.11.0 버전으로 설치되며, 해당 버전은 라즈베리파이 이 보드 관련 config 파일이 없습니다.
- 참고 문서
JTAG를 통해 RaspberryPI4 디버깅 방법
https://medium.com/@0xNoor/setup-openocd-with-jtag-uart-on-raspberry-pi-4-using-ft232h-da05ca01c693
Debugging를 위한 Linux 빌드 방법
https://littlebitodd-developer.tistory.com/74
Qemu로 실행한 리눅스 GDB로 디버깅 방법
https://littlebitodd-developer.tistory.com/75
1. 서론
저는 이전에 Qemu 에뮬레이터에서 실행 중인 Linux를 GDB로 디버깅을 해본적이 있습니다. 이를 통해 Linux의 부팅 과정을 코드 라인 단위로 디버깅이 가능했었습니다. 이번에는 에뮬레이터가 아닌 실제 하드웨어서 JTAG로 디버깅을 하는 방법에 대해서 알아 보려고 합니다. 이 포스트를 통해 JTAG를 통해 디버깅하는 방법과 리눅스를 디버깅하는 방법까지 소개 할 예정입니다.
내용이 방대하기 떄문에 2개의 포스트로 나누어 소개 할 예정입니다.
2. 하드웨어 구성

2.1. Serial 통신
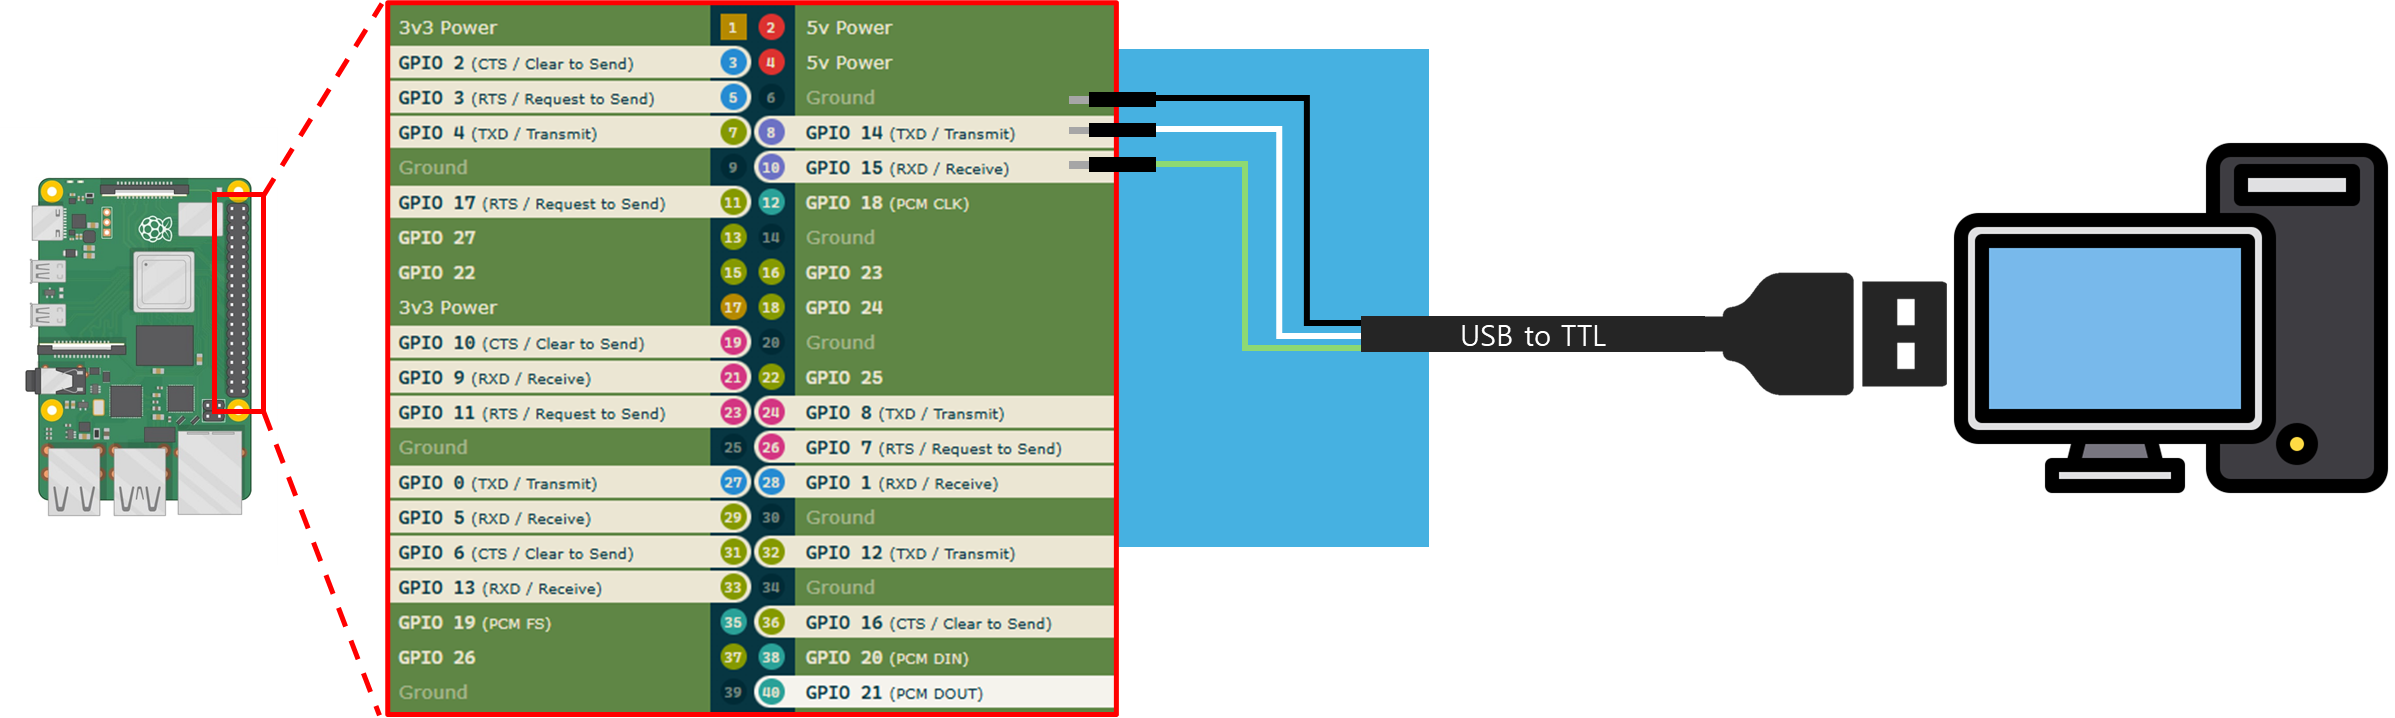
라즈베리파이는 Serial를 통해 Linux Terminal 및 Log를 정보를 송수신 합니다. 그러므로 Serial를 통해서 Uboot 명령어를 송신하거나 Linux의 printk 메세지 등을 확인 할 수 있습니다.
저는 아래 제품을 사용하여 PC와 연결 하였습니다.
PL2303HX 컨버터 UART USB to RS232 TTL 변환 케이블 - 시리얼 통신 아두이노 라즈베리파이 MCU 개발용 - 케
쿠팡에서 PL2303HX 컨버터 UART USB to RS232 TTL 변환 케이블 - 시리얼 통신 아두이노 라즈베리파이 MCU 개발용 구매하고 더 많은 혜택을 받으세요! 지금 할인중인 다른 케이블 제품도 바로 쿠팡에서 확
www.coupang.com
하지만 다른 USB to RS232 TTL 제품이 있다면 해당 제품을 사용해도 문제 없습니다.
주의점)
반드시 Rx, Tx 연결을 확인하세요

위 보이는 것처럼 하양색은 Rx, 초록색은 Tx입니다.
그러므로 RaspberryPI Tx를 USB to RS232 TTL의 Rx에 연결해야 합니다. Rx는 그의 반대입니다.
2.2. JTAG 통신
다음으로 JTAG통신을 연결하는 방법에 대해서 알아보겠습니다.
먼저 FT232H 모듈을 구매해야합니다.
FT232H 다기능 모듈 USB 2.0 고속 480Mb/s USB to JTAG UART FIFO SPI I2C 모듈 - AliExpress
Smarter Shopping, Better Living! Aliexpress.com
ko.aliexpress.com
FT232H는 JTAG 뿐만이 아니라 다양한 통신을 위한 모듈입니다. 하지만 다행이도 이렇게 저렴한 가격에 JTAG을 지원하는 모듈이고 취미로 임베디드를 하는 사람으로서 충분히 지불할만한 가격입니다.
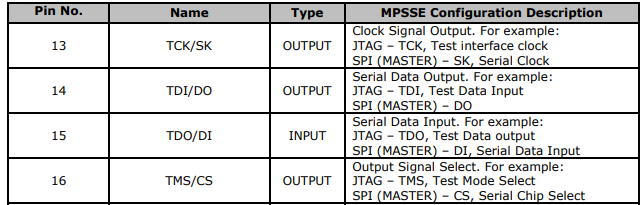
JTAG는 기본적으로 4개의 핀을 사용하여 통신합니다.(SPI 통신이랑 비슷합니다) 핀 연결 방법은 아래 그림으로 설명하였습니다.

주의점)
반드시 I2C Mode 스위치를 Off 로 설정해야합니다.
FT232H Datasheet)
https://ftdichip.com/wp-content/uploads/2024/09/DS_FT232H.pdf
FT232H의 JTAG Pin 관련한 내용은 Datasheet의 "3.5.5. FT232H Pins used in an MPSSE" 에 명시되어 있습니다.

그리고 Host PC와 FT232와 정상적으로 연결되었다면 lsusb로 정상 연결되었는지 확인해볼 수 있습니다.
lsusb

3. 디버깅을 위한 Linux 빌드
https://github.com/MainForm/rpi4_debug_linux_with_JTAG_with_UBOOT
GitHub - MainForm/rpi4_debug_linux_with_JTAG_with_UBOOT
Contribute to MainForm/rpi4_debug_linux_with_JTAG_with_UBOOT development by creating an account on GitHub.
github.com
저는 buildroot를 사용해 Linux를 빌드하였습니다.
또한, 하기 귀찮은 Buildroot 설정 및 Linux kernel 설정을 제가 다 해놨으므로 그냥 빌드한 하시면 됩니다.
# buildroot 필요 package 설치
sudo apt install sed make binutils build-essential diffutils bash patch gzip bzip2 perl tar cpio unzip rsync file bc findutils libncurses5-dev libncursesw5-dev bzr curl cvs git mercurial libssl-dev subversion

# Linux build 환경 clone
git clone https://github.com/MainForm/rpi4_debug_linux_with_JTAG_with_UBOOT.git ./br2_rpi4_debug

# buildroot submodule update
cd br2_rpi4_debug
git submodule update --init --recursive

# 빌드 환경 구성
make raspberrypi4_64_defconfig

# 리눅스 빌드
make -C output/raspberrypi4_64
WSL에서 빌드시 PATH 관련 에러가 발생하면 아래 포스트를 참고하세요
https://littlebitodd-developer.tistory.com/20
buildroot 빌드시 PATH 애러 해결
1. 문제 원인위 해당 에러의 경우 PATH 환경변수에 스페이스, 탭, 개행 문자가 포함되어 있을 경우 발생하는 에러 입니다.echo $PATH위 명령어를 실행하면 위 문자가 포함되어 있는 것을 확인 할 수
littlebitodd-developer.tistory.com
그래도 디버깅을 위해 어떤 설정을 했는지는 너무 길어지므로 다른 포스트를 참고 부탁드립니다.
3.1. U-boot 설정
https://littlebitodd-developer.tistory.com/100
[Buildroot] 라즈베리파이4 U-boot 부트로더 설정
- 개발 환경개발 보드 : Raspberrypi 4WSL2 (Ubuntu 24.04 LTS)buildroot(2024.02)- 소스 코드https://github.com/MainForm/rpi4_debug_linux_with_JTAG_with_UBOOT GitHub - MainForm/rpi4_debug_linux_with_JTAG_with_UBOOTContribute to MainForm/rpi4_debug_l
littlebitodd-developer.tistory.com
리눅스 디버깅 하기전 JTAG를 연결해야합니다. 하지만 U-boot bootloader를 사용하지 않는다면 부팅후 자동적으로 리눅스 커널을 부팅 해버리기 때문에 JTAG를 연결할 시간이 없습니다. 그로므로 U-boot bootloader를 사용하여 Linux 커널 부팅전 U-boot에서 대기 후 JTAG로 연결한 다음 Linux 을 부팅하기 위해 U-boot를 설정하야여 합니다.
3.2. 리눅스 디버깅 심볼 관련 커널 설정
https://littlebitodd-developer.tistory.com/74
[Linux Debugging] Buildroot를 통해 디버깅할 리눅스 빌드
- 개발 환경WSL2 (Ubuntu 24.04 LTS)buildroot(2024.02)1. 서론 리눅스 커널을 공부하면서 어떻게 하면 일반적인 어플리케이션을 디버깅 할 때 처럼 직관적이고 커널의 코드흐름을 확인 할 수 있는 방법을 고
littlebitodd-developer.tistory.com
기본적으로 리눅스 커널 이미지에는 디버깅 심볼이 포함되어 있지 않기에 디버깅할 수 없습니다. 그러므로 이미지에 디버깅 심볼을 추가하여 GDB로 디버깅 할 수 있는 설정을 하였습니다.
3.3. 라즈베리파이 JTAG 활성화
라즈베리파이는 config.txt 파일을 통해 부팅 전 미리 기능을 활성화 할 수 있습니다. 그 중 JTAG도 마찬가지 입니다.
https://www.raspberrypi.com/documentation/computers/config_txt.html#enable_jtag_gpio
<code>config.txt</code> - Raspberry Pi Documentation
The official documentation for Raspberry Pi computers and microcontrollers
www.raspberrypi.com
- config.txt
# Please note that this is only a sample, we recommend you to change it to fit
# your needs.
# You should override this file using BR2_PACKAGE_RPI_FIRMWARE_CONFIG_FILE.
# See http://buildroot.org/manual.html#rootfs-custom
# and http://elinux.org/RPiconfig for a description of config.txt syntax

start_file=start4.elf
fixup_file=fixup4.dat

# kernel=Image
kernel=u-boot.bin

# To use an external initramfs file
#initramfs rootfs.cpio.gz

# Disable overscan assuming the display supports displaying the full resolution
# If the text shown on the screen disappears off the edge, comment this out
disable_overscan=1

# How much memory in MB to assign to the GPU on Pi models having
# 256, 512 or 1024 MB total memory
gpu_mem_256=100
gpu_mem_512=100
gpu_mem_1024=100

# fixes rpi (3B, 3B+, 3A+, 4B and Zero W) ttyAMA0 serial console
# dtoverlay=miniuart-bt
dtoverlay=disable-bt
enable_uart=1

# enable autoprobing of Bluetooth driver without need of hciattach/btattach
dtparam=krnbt=on

# enable 64bits support
arm_64bit=1

# Configure GPIOs for debugging via JTAG
# Disable pull-downs
gpio=22-27=np

# Enable JTAG pins (GPIO22-GPIO27)
enable_jtag_gpio=1
그러므로 enable_jtag_gpio를 1로 하여 미리 JTAG를 활성화 합니다.
4. openOCD 설치
https://openocd.org/pages/getting-openocd.html
# openOCD 설치
sudo apt install openocd

# openOCD 버전 확인(반드시 0.12.0 이상일 것)
openocd -v

주의점)
반드시 openOCD의 버전이 0.12.0 이상이여야 합니다.
openOCD(On Chip Debugger)는 JTAG와 GDB사이를 연결해주는 중간 서버입니다.

5. gdb-multiarch 설치
GDB는 ASM, C, C++에서 가장 많이 쓰이는 디버거 입니다. 그래서 대부분의 toolchain을 설치하면 gdb도 같이 포함되어 있는 경우가 많습니다. 그리고 이전에는 CPU 아키텍쳐 마다 GDB를 맞추어 설치하여야 하지만 현재는 gdb-multiarch를 통해 gdb내 아키텍쳐만 설정하면 굳이 gdb를 따로 설치할 필요가 없습니다.
# gdb-multiarch 설치
sudo apt install gdb-multiarch
6. 후기
드디어 라즈베리파이를 JTAG로 디버깅할 환경이 준비되었습니다. 드디어 다음 포스트에서 JTAG를 통해 리눅스 커널 중 start_kernel을 디버깅 할 예정입니다. 이를 통해 Qemu라는 에뮬레이털 뿐만이 아니라 실제 하드웨어를 디버깅하면서 JTAG을 사용하는 방법을 학습할 수 있습니다.
'Embedded > Raspberry PI' 카테고리의 다른 글
| [RaspberryPI4] Bare metal에서 UART 수신(Rx) 구현 (0) | 2025.07.27 |
|---|---|
| [RaspberryPI4] Bare metal에서 UART통신 구현 (0) | 2025.07.18 |
| [RaspberryPI4] Bare metal에서 UART통신을 위한 레지스터 확인 (0) | 2025.07.18 |
| [RaspberryPI4] Bare metal에서 C언어로 GPIO 제어 (0) | 2025.07.16 |
| [RaspberryPI4] Bare metal에서 개발한 image 실행 (0) | 2025.07.12 |


