| 일 | 월 | 화 | 수 | 목 | 금 | 토 |
|---|---|---|---|---|---|---|
| 1 | 2 | 3 | 4 | 5 | 6 | 7 |
| 8 | 9 | 10 | 11 | 12 | 13 | 14 |
| 15 | 16 | 17 | 18 | 19 | 20 | 21 |
| 22 | 23 | 24 | 25 | 26 | 27 | 28 |
- nucleo
- 라즈베리파이
- 디버깅
- Arduino
- esp32
- c#
- AArch64
- Debugging
- GPIO
- UART
- bare metal
- QEMU
- atmel
- AVR
- yocto
- Linux
- raspberrypi
- vscode
- WPF
- C++
- Visual Studio Code
- Raspberry
- 리눅스
- 회로
- 아두이노
- Debug
- buildroot
- STM32
- avr-gcc
- Visual Studio
- Today
- Total
임베디드를 좋아하는 조금 특이한 개발자?
[Linux Kernel Debugging] VScode로 간편히 Linux kernel 디버깅하기 본문
- 개발 환경
WSL2 (Ubuntu 24.04 LTS)
buildroot (2024.02)
Qemu emulator (8.2.2 (Debian 1:8.2.2+ds-0ubuntu1.8))
- 사전 필요 작업
https://littlebitodd-developer.tistory.com/74
[Linux Debugging] Buildroot를 통해 디버깅할 리눅스 빌드
- 개발 환경WSL2 (Ubuntu 24.04 LTS)buildroot(2024.02)1. 서론 리눅스 커널을 공부하면서 어떻게 하면 일반적인 어플리케이션을 디버깅 할 때 처럼 직관적이고 커널의 코드흐름을 확인 할 수 있는 방법을 고
littlebitodd-developer.tistory.com
- 참고 포스트
https://littlebitodd-developer.tistory.com/75
[Linux Debugging] QEMU로 실행한 Linux를 GDB로 디버깅
- 개발 환경WSL2 (Ubuntu 24.04 LTS)buildroot (2024.02)Qemu emulator (8.2.2 (Debian 1:8.2.2+ds-0ubuntu1.8))- 사전 필요 작업https://littlebitodd-developer.tistory.com/74 [Linux Debugging] Buildroot를 통해 디버깅할 리눅스 빌드- 개발 환
littlebitodd-developer.tistory.com
1. 서론
GDB로 디버깅을 해도 충분하지만 저의 경우 VisualStudio Code(이하 VSCode)로 디버깅하는 편이 편하다고 생각합니다. 그래서 VSCode로 디버깅을 하는 법을 소개하고자 합니다.
2. VS Code 설정
먼저 VS Code에서 디버깅 관련 설정을 해야합니다. 그러므로 관련 설정을 저장할 파일을 생성하도록 하겠습니다.
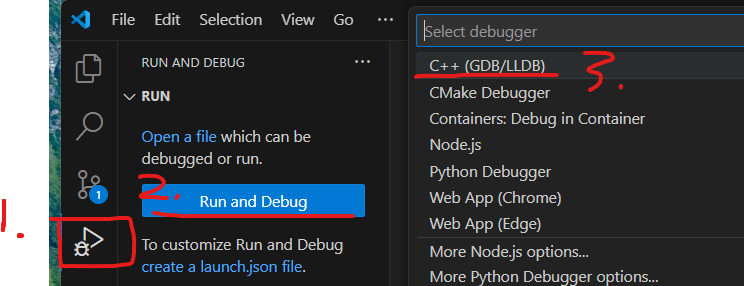
위 순서대로 클릭한다면 아래 그림과 같이 .vscode 폴더내 launch.json 파일이 생성된 것을 확인 할 수 있습니다.
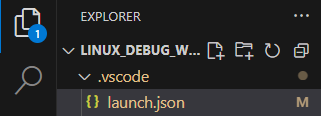
해당 launch.json 파일에 아래 내용을 그대로 붙여 넣습니다.
{
    // Use IntelliSense to learn about possible attributes.
    // Hover to view descriptions of existing attributes.
    // For more information, visit: https://go.microsoft.com/fwlink/?linkid=830387
    "version": "0.2.0",
    "configurations": [
        {
            "name": "Debug linux kernel",
            "type": "cppdbg",
            "request": "launch",
            "program": "${workspaceRoot}/output/build/linux-6.1.44/vmlinux",
            "miDebuggerServerAddress": "localhost:1234",
            "args":[],
            "cwd" :"${fileDirname}",
            "miDebuggerPath": "${workspaceRoot}/output/host/bin/aarch64-buildroot-linux-gnu-gdb",
            "stopAtEntry": true,
            "externalConsole": false,
            "MIMode": "gdb"
        }
    ]
}
필요한 설정에 대해서만 소개 하도록 하겠습니다.
- "program": "${workspaceRoot}/output/build/linux-6.1.44/vmlinux"
디버깅 심볼을 가지고 있는 ELF 파일을 설정합니다.
주의)
buildroot의 버전에 따라 리눅스의 버전이 달라 질 수 있습니다.
저의 경우 buildroot의 버전이 2024.02 버전을 사용하고 있어 Linux 버전이 6.1.44입니다.
또한, 디버깅 심볼을 저장 할 수 있도록 리눅스 빌드시 옵션을 설정해야합니다. - "miDebuggerServerAddress": "localhost:1234"
Qemu에 연결하기 위한 IP 및 Port 설정 - "miDebuggerPath": "${workspaceRoot}/output/host/bin/aarch64-buildroot-linux-gnu-gdb"
실행할 GDB의 위치 설정
3. BreakPoint 설정
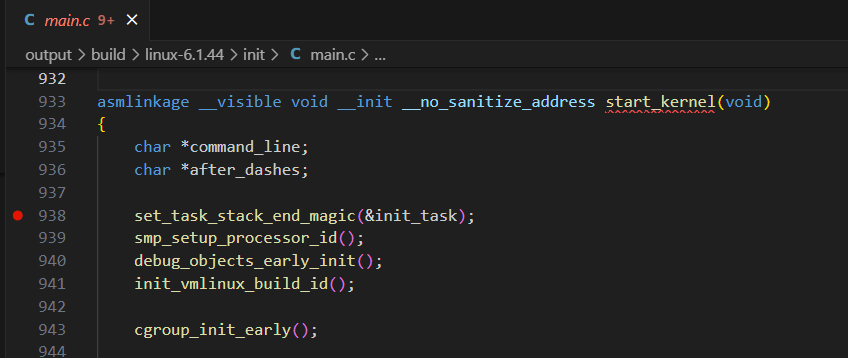
Buildroot에서 빌드한 Linux 소스코드의 위치는 "output/build/linux-6.1.44"에 있습니다. 그 중 start_kernel() 함수는 init/main.c 파일에 있으므로 해당 파일로 이동해 BreakPoint를 설정합니다.
4. Qemu 실행 후 디버깅
qemu-system-aarch64 -M virt -cpu cortex-a57 -smp 1 -kernel ./output/images/Image -drive file=./output/images/rootfs.ext4,if=none,format=raw,id=hd0 -device virtio-blk-device,drive=hd0 -append "root=/dev/vda console=ttyAMA0" -nographic -S -gdb tcp::1234,ipv4
위 명령어를 통해 Qemu을 실행합니다.
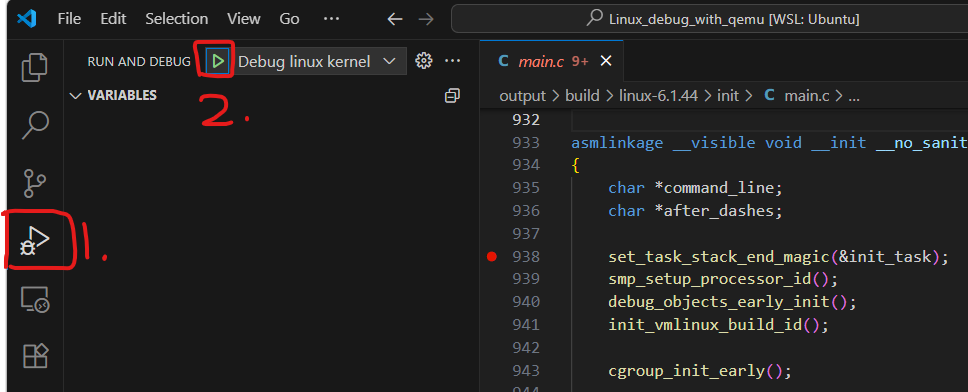
위 순서대로 VS Code에서 디버깅을 실행합니다.
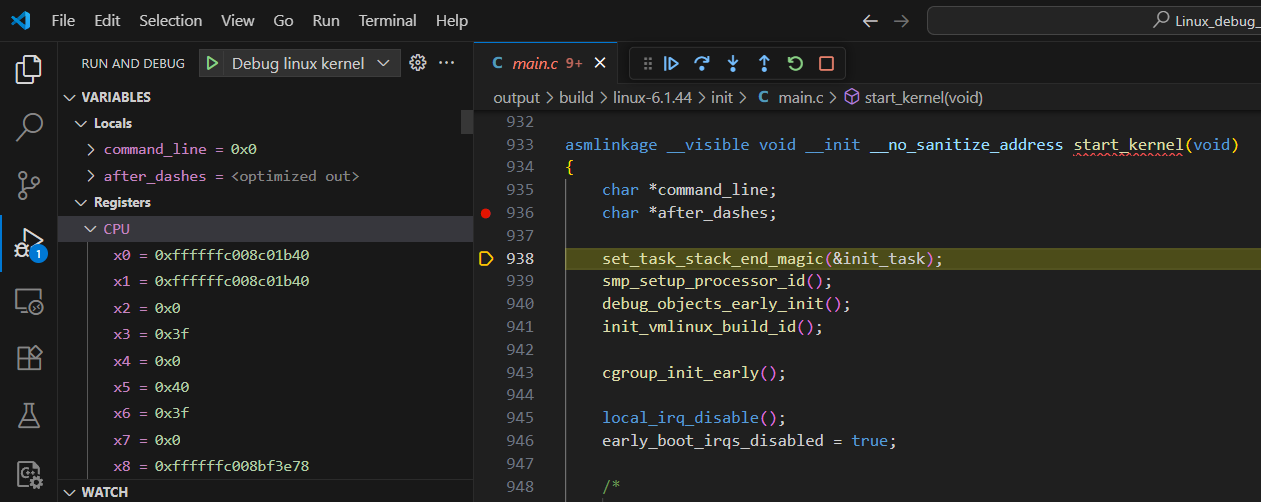
정상적으로 디버깅 되는 모습을 볼 수 있습니다.
'Embedded > Linux' 카테고리의 다른 글
| [Linux Kernel Module] Character Device(문자 장치) 초기화 및 생성 (1) | 2025.08.11 |
|---|---|
| [Linux Kernel Module] 개발 프로젝트 구성 (0) | 2025.08.09 |
| [Linux Debugging] QEMU로 실행한 Linux를 GDB로 디버깅 (1) | 2025.08.05 |
| [Linux Debugging] Buildroot를 통해 디버깅할 리눅스 빌드 (3) | 2025.08.03 |


