| 일 | 월 | 화 | 수 | 목 | 금 | 토 |
|---|---|---|---|---|---|---|
| 1 | 2 | 3 | 4 | 5 | 6 | |
| 7 | 8 | 9 | 10 | 11 | 12 | 13 |
| 14 | 15 | 16 | 17 | 18 | 19 | 20 |
| 21 | 22 | 23 | 24 | 25 | 26 | 27 |
| 28 | 29 | 30 | 31 |
- 라즈베리파이
- UART
- raspberrypi
- STM32
- vscode
- Raspberry
- platformio
- bare metal
- QEMU
- Visual Studio
- AVR
- AArch64
- Arduino
- 리눅스
- WPF
- atmel
- esp32
- nucleo
- Linux
- c#
- Debug
- Visual Studio Code
- yocto
- C++
- avr-gcc
- 아두이노
- buildroot
- 디버깅
- Debugging
- GPIO
- Today
- Total
임베디드를 좋아하는 조금 특이한 개발자?
[ESP32] LVGL를 통한 GUI 개발 환경 구축 본문
- 개발 환경
- 개발 환경
Macbook Pro 14 (M3)
macOS : Sequoia 15.4
PlatformIO 사용
- 하드웨어 : Crowpanel 7.0inch
- MCU : ESP32-S3
- Display : 7inch, 800 x 480
- 부가 기능 : 스피커, 마이크로 SD카드, 배터리 부착 가능
1. 서론
디스플레이는 요즘 모든 제품에 들어간다고 하여도 과언이 아닙니다. 디스플레이는 직관성이 좋고 좁은 화면에서 다양한 기능을 사용자에게 제공하기에도 적합하며 업데이트를 통한 기능 추가에도 도움이 됩니다. 게다가 터치가 되는 디스플레이는 사용하기 매우 편리합니다.
하지만 임베디드에서 좋은 디스플레이를 사용하는 것에 대해서 많은 부담이 있다는 것도 사실입니다. 임베디드라는 제한된 하드웨어(메모리 및 CPU 클럭 등)에서 고해상도의 GUI 화면을 제공한다는 것이 쉽지 않은 일입니다. 하지만 최근 개발되어 나오는 MCU(STM32 및 ESP32)의 경우 성능이 많이 좋아지고 저렴해졌습니다. 그래서 이번 기회에 LVGL이라는 라이브러리를 통해 GUI을 제공하는 프로토타입을 제작하면서 공부해 나아가려 합니다.
2. 하드웨어 선택
ESP32 display-7.0 Inch HMI Display 800x480 RGB TFT LCD Touch Screen Compatible with Arduino/LVGL
This ESP32 Display 7.0-inch module features a touch LCD display with a resolution of 800*4800 and is a powerful HMI RGB touch screen. It is compatible with LVGL, Arduino and support Espressif IDF, Lua RTOS, Micro python.
www.elecrow.com
다행스럽게도 LVGL용 교육 제품을 발견하여 해당 제품을 구매하였습니다. 따로 납땜이나 부가적인 노동이 필요 없이 그대로 개발할 수 있도록 하여 매우 편하게 개발 할 수 있었습니다. 더군다나 가격도 저렴하고 부가적인 기능을 추가할 수 있도록 악세사리도 제공하고 있습니다. 하지만 가장 큰 이유는 제품에 대한 사용 방법이 매우 잘 정리되어 있었기 때문입니다. Youtube에 동영상도 제공해주고 있어 개발하기 편하였습니다. 또한 Wiki또한 잘 정리되어 있었습니다.
교육 Youtube 영상
https://www.youtube.com/watch?v=EYwEfrTWXyY&list=PLwh4PlcPx2GcKJ17Z_xcAxQoh-Tmms_X1
예제 코드
CrowPanel-ESP32-Display-Course-File/CrowPanel_ESP32_Tutorial/Code/V3.0 at main · Elecrow-RD/CrowPanel-ESP32-Display-Course-File
Elecrow CrowPanel ESP32 HMI Display Course File. Contribute to Elecrow-RD/CrowPanel-ESP32-Display-Course-File development by creating an account on GitHub.
github.com
제품 Wiki
CrowPanel ESP32 HMI 7.0-inch Display - Elecrow Wiki
CrowPanel ESP32 HMI 7.0-inch Display Requirements for the relevant version of the routine Board Version esp32 by Espressif System 2.0.14/2.0.15 Lib Related Versions Ivgl: 8.3.3 TFT_eSPI: 2.5.0 LovyanGFX: 1.1.8 The libs are provided directly by our wiki, ju
www.elecrow.com
3. 개발 환경 구축
아두이노IDE에서 개발하여도 좋지만 저는 아두이노IDE를 싫어합니다. 그러므로 VScode에 있는 PlatformIO extention으로 개발을 할 것입니다. 진행하다가 이해가 안되거 잘 모르는 부분은 회사에서 제공하는 문서를 확인해보시기 바랍니다.
https://www.elecrow.com/wiki/CrowPanel_ESP32_7.0-inch_with_PlatformIO.html
CrowPanel ESP32 7.0-inch with PlatformIO - Elecrow Wiki
CrowPanel ESP32 7.0-inch with PlatformIO Overview The example is an environmental monitoring project, using a DHT20 sensor to obtain the environment temperature and humidity and display it on the screen; and control the LED on and off by the buttons on the
www.elecrow.com
먼저 Visual studio code에서 PlatformIO IDE을 설치합니다. Extension을 설치하면 알아서 PlatformIO설치가 완료됩니다.
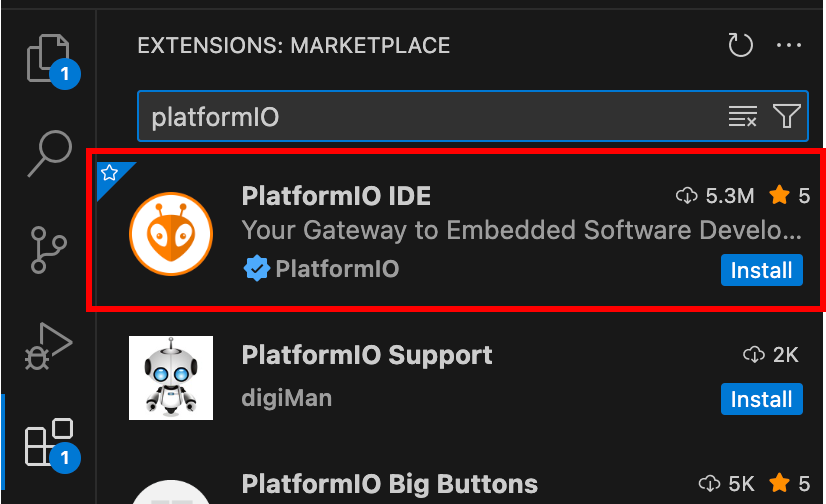
Crowpanel의 MCU는 ESP32-S3이지만, PlatformIO에서 공식으로 지원하지 않기에 추가적인 작업이 필요합니다.
PlatformIO용 Crowpanel 하드웨어 설정 파일
위 링크에서 다운로드 받은 파일을 압축 풀어 아래 위치에 옮겨주도록 하겠습니다.
Linux & Mac : ~/.platformio/platforms/espressif32/boards/
Window : C:\Users\(사용자 이름)\.platformio\platforms\espressif32\boards\

3.1. 프로젝트 생성
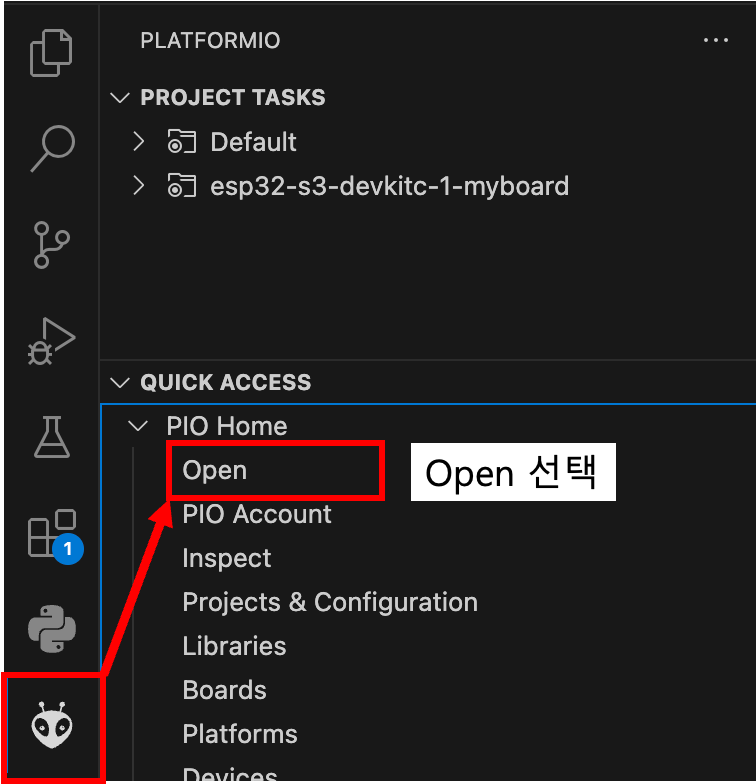
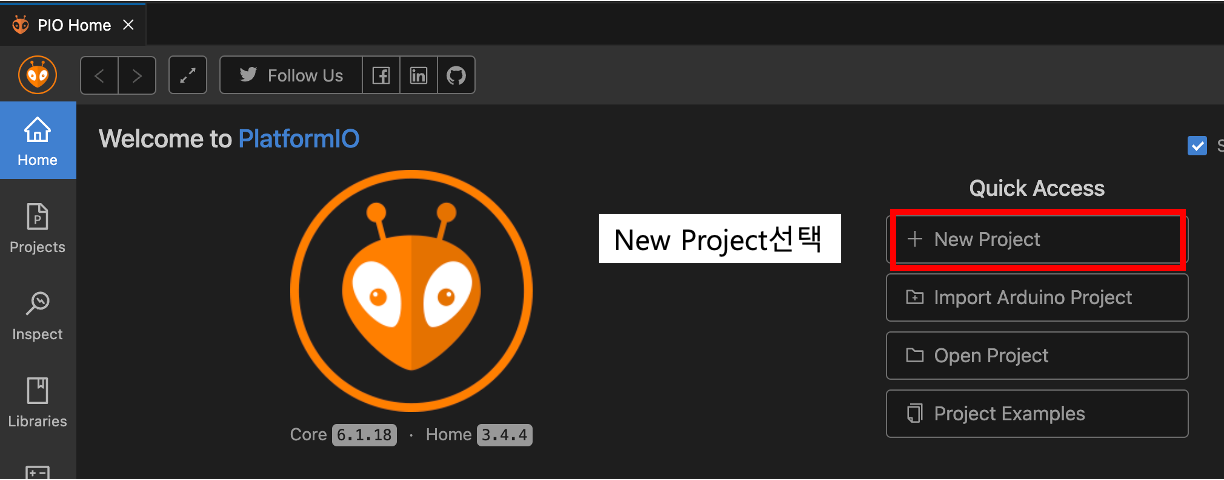
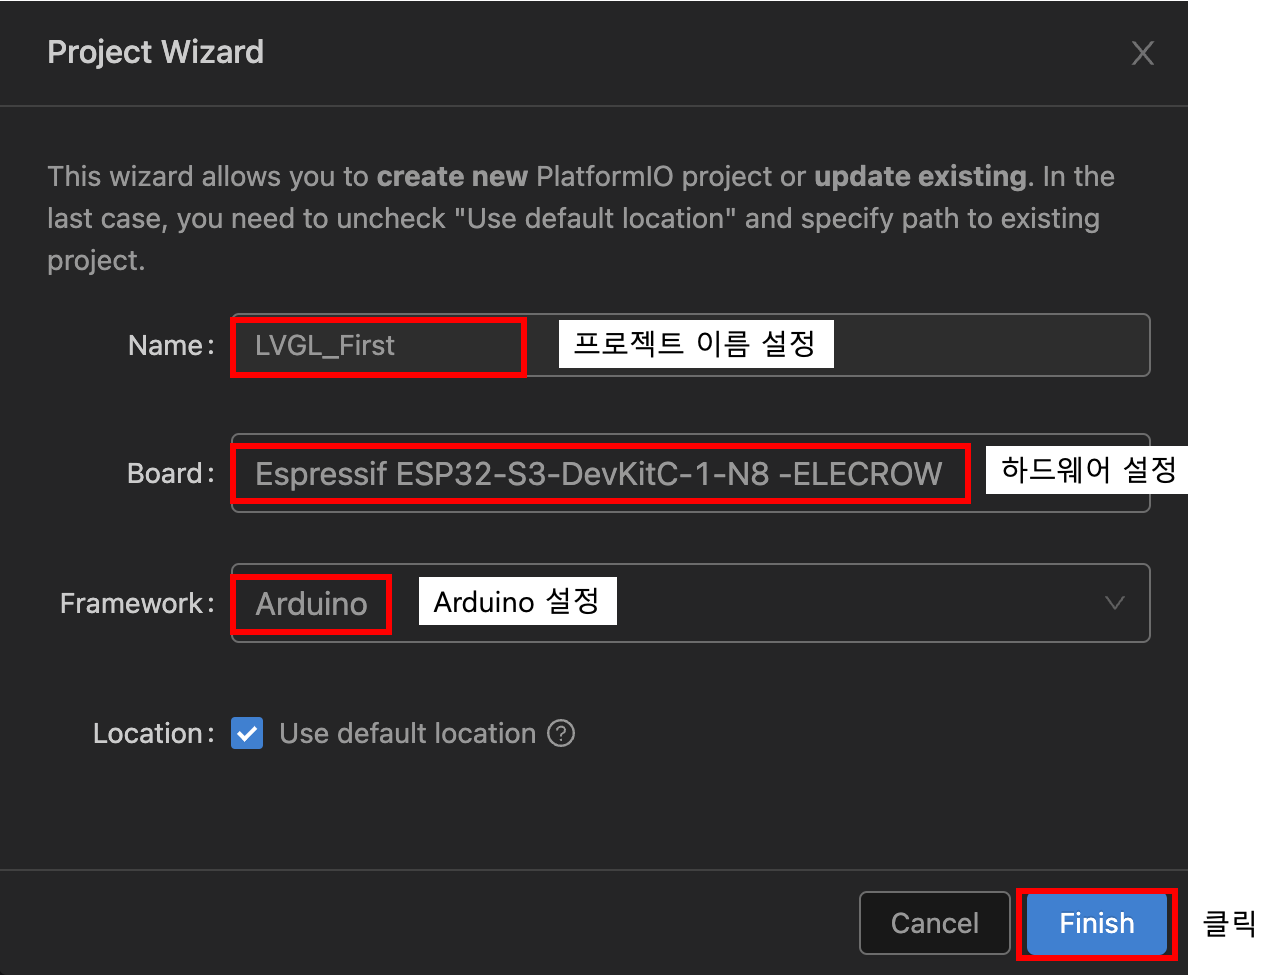
대부분은 자동적으로 프로젝트가 열리지만 만약 다시 프로젝트을 열고 싶다면 아래 사진을 참고하시면 됩니다.

3.2. 프로젝트 설정 및 라이브러리 설정
위 "huge_app.csv" 파일을 다운로드 받아 프로젝트에 추가합니다.
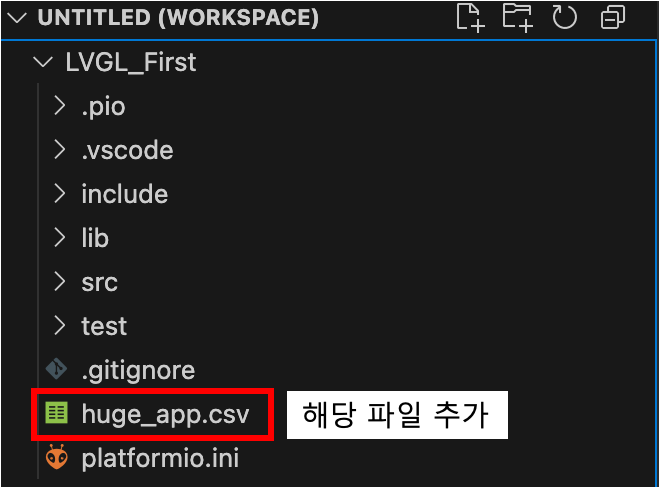
그 다음 platformio.ini의 파일을 다음과 같이 수정합니다.
[env:esp32-s3-devkitc-1-myboard]
platform = espressif32
board = esp32-s3-devkitc-1-myboard
framework = arduino
platform_packages = framework-arduinoespressif32 @ https://github.com/espressif/arduino-esp32#2.0.3
board_build.partitions = huge_app.csv
upload_speed = 460800
이제 프로젝트를 빌드하면 정상적으로 빌드가 완료되며 Crowpanel에 펌웨어 업로드까지 가능합니다. 하지만 디스플레이에 아무것도 출력되지 않습니다. 디스플레이를 출력하기 위해 필요한 라이브러리를 추가하도록 하겠습니다.
3.2.1. LovyanGFX 라이브러리 설치


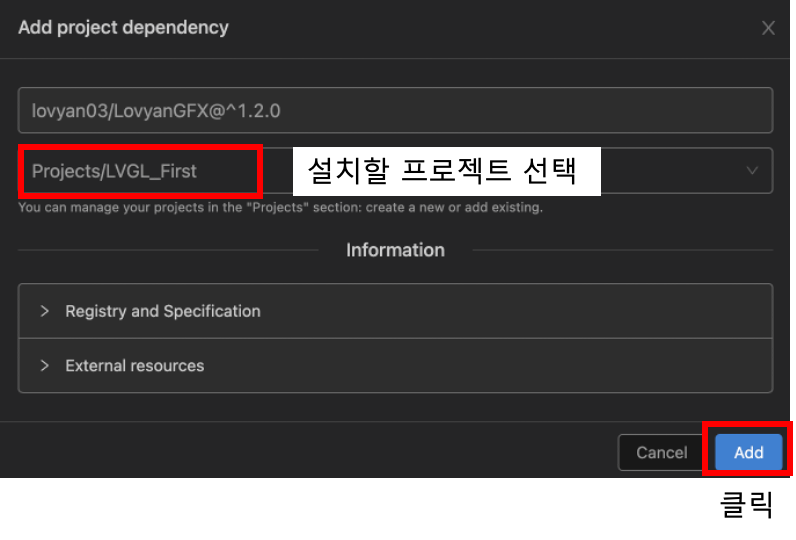
Crowpanel 제품에 맞추어 설정을 한 헤더파일을 배포하고 있습니다.
CrowPanel-ESP32-Display-Course-File/CrowPanel_ESP32_Tutorial/Code/V3.0/Lesson 2 Draw GUI with LovyanGFX/4.3inch_5inch_7inch/Draw
Elecrow CrowPanel ESP32 HMI Display Course File. Contribute to Elecrow-RD/CrowPanel-ESP32-Display-Course-File development by creating an account on GitHub.
github.com
위 gfx_conf.h 파일을 프로젝트 파일 내 "include"파일에 추가합니다.

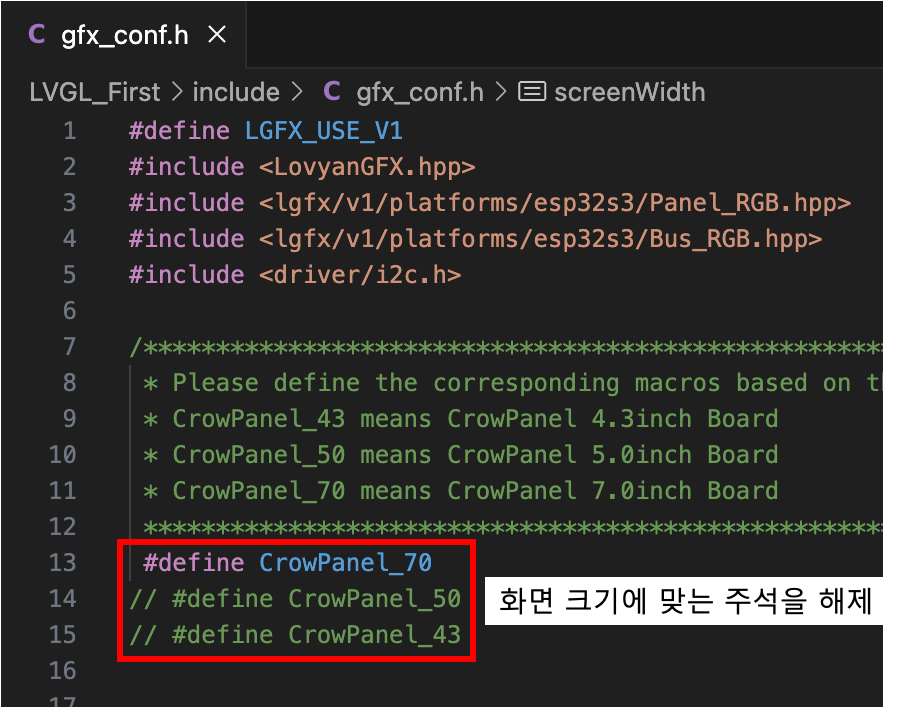
3.2.2. LVGL 라이브러리 설치
Crowpanel은 LVGL의 버전중 8.3.11 버전을 사용을 권하고 있습니다.
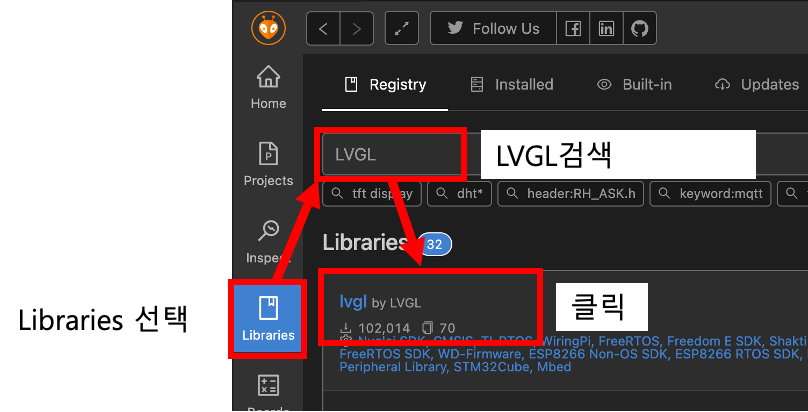
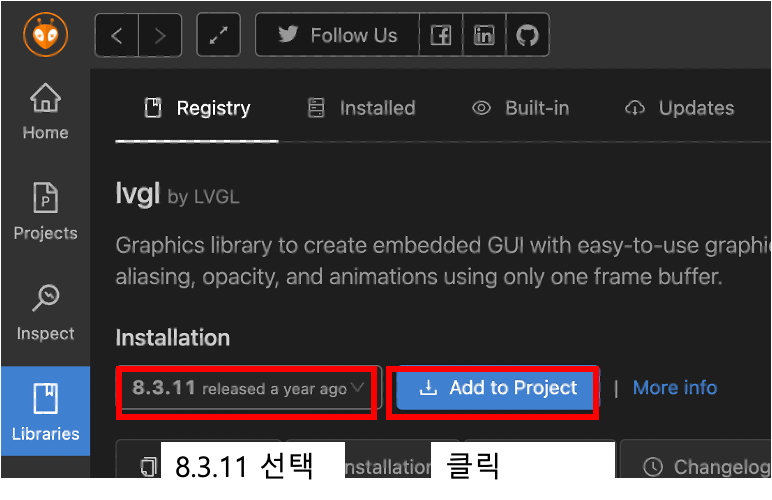
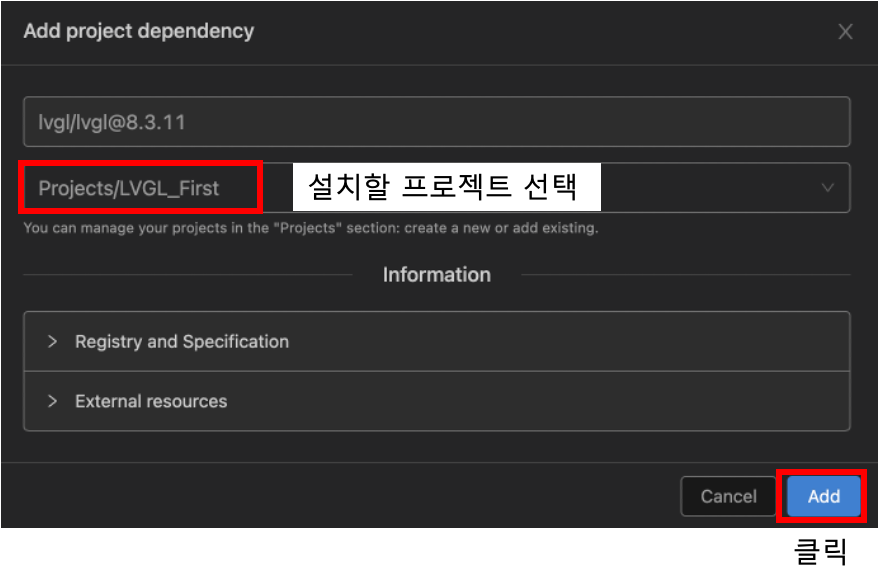
Crowpanel에 맞추어 lvgl 라이브러리를 설정해야합니다.
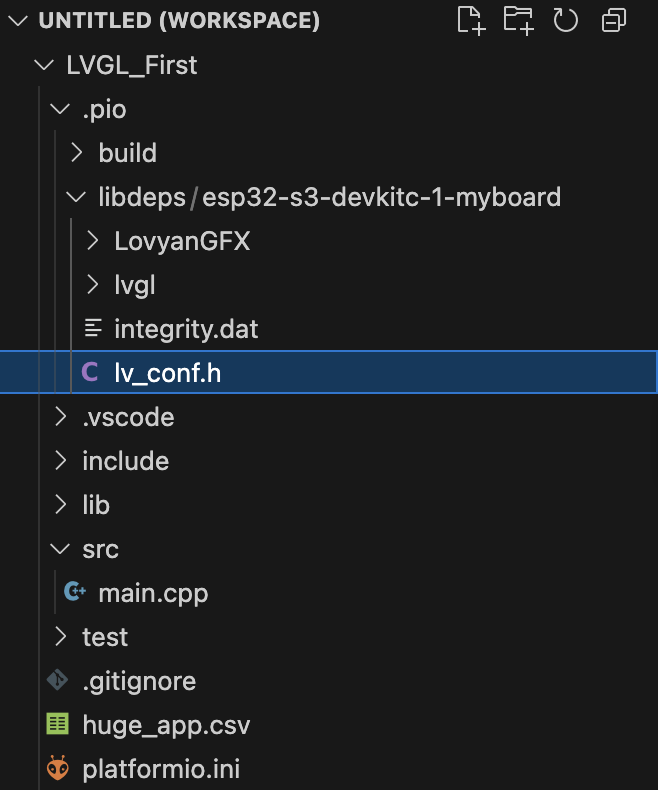
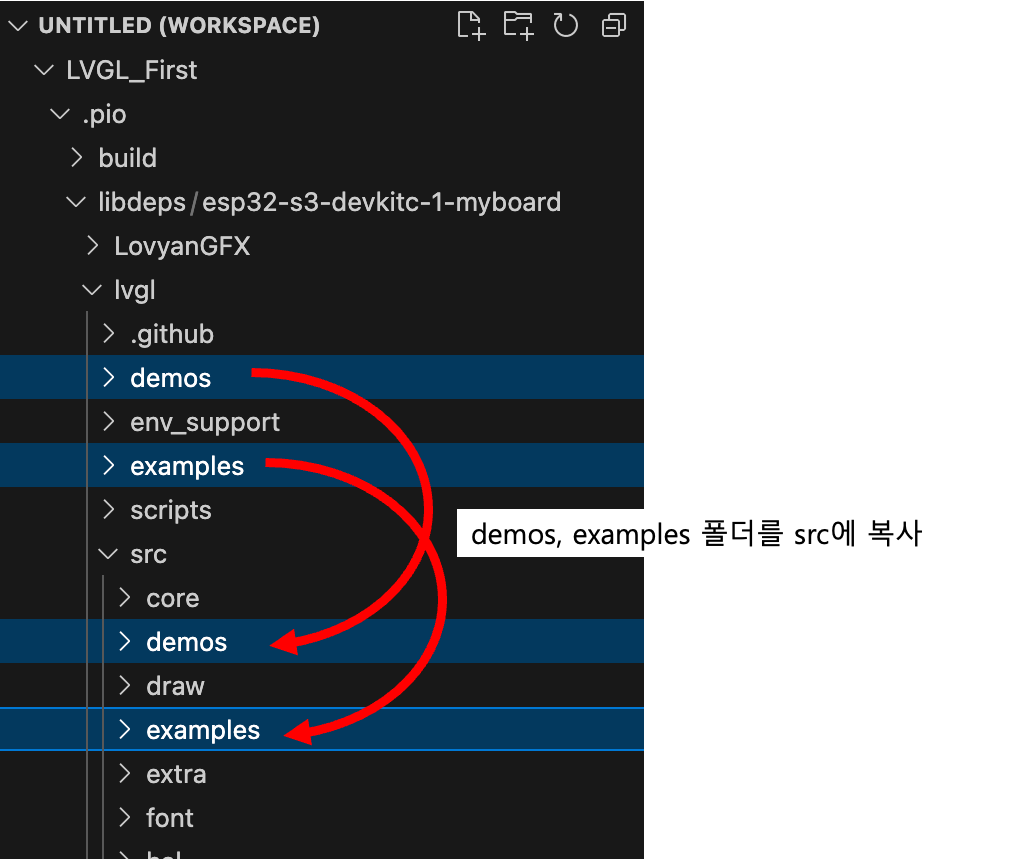
먼저 아래 헤더 파일을 다음과 같은 위치에 추가해줍니다.
.pio/libdeps/esp32-s3-devkitc-1-myboard/
CrowPanel-ESP32-Display-Course-File/CrowPanel_ESP32_Tutorial/Code/V3.0/Lesson 5 LVGL Demo Test/lv_conf.h at main · Elecrow-RD/C
Elecrow CrowPanel ESP32 HMI Display Course File. Contribute to Elecrow-RD/CrowPanel-ESP32-Display-Course-File development by creating an account on GitHub.
github.com
3.2.1. PCA9557 라이브러리 설치
아래 PCA9557.cpp파일을 src 폴더에 넣어줍니다.
CrowPanel-ESP32-Display-Course-File/CrowPanel_ESP32_Tutorial/File/PCA9557/PCA9557.cpp at main · Elecrow-RD/CrowPanel-ESP32-Disp
Elecrow CrowPanel ESP32 HMI Display Course File. Contribute to Elecrow-RD/CrowPanel-ESP32-Display-Course-File development by creating an account on GitHub.
github.com
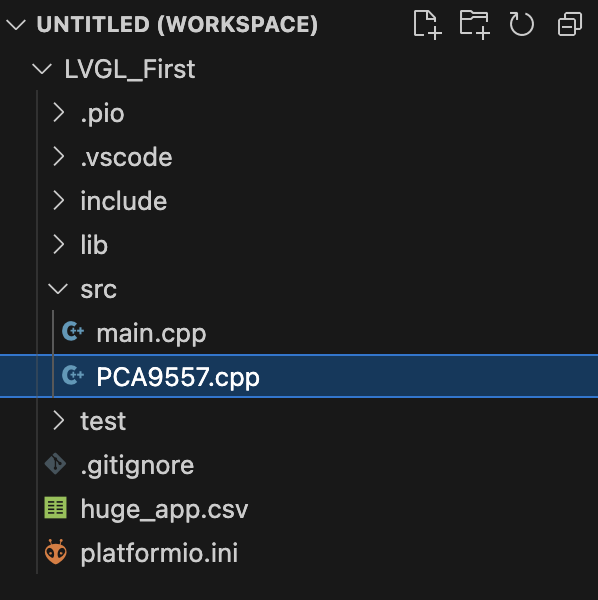
아래 PCA9557.h 파일을 include 파일에 넣어줍니다.
CrowPanel-ESP32-Display-Course-File/CrowPanel_ESP32_Tutorial/File/PCA9557/PCA9557.h at main · Elecrow-RD/CrowPanel-ESP32-Displa
Elecrow CrowPanel ESP32 HMI Display Course File. Contribute to Elecrow-RD/CrowPanel-ESP32-Display-Course-File development by creating an account on GitHub.
github.com

4. 데모 예제 빌드 및 실행
CrowPanel-ESP32-Display-Course-File/CrowPanel_ESP32_Tutorial/Code/V3.0/Lesson 5 LVGL Demo Test/4.3-5-7inch/CrowPanel_ESP32_LVGL_
Elecrow CrowPanel ESP32 HMI Display Course File. Contribute to Elecrow-RD/CrowPanel-ESP32-Display-Course-File development by creating an account on GitHub.
github.com
위 스케치 파일에서 작성되어 있는 코드를 main.cpp에 붙여 넣습니다.

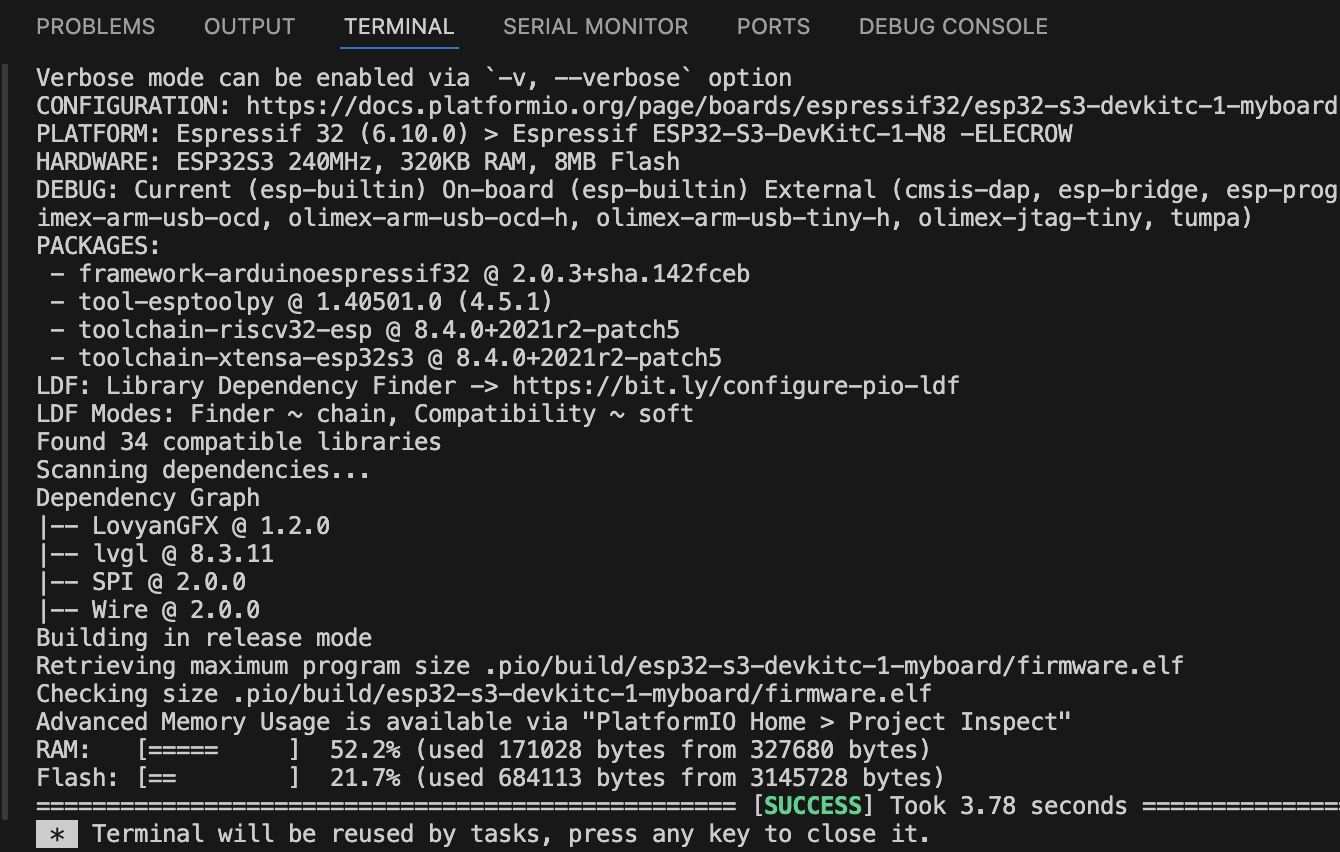
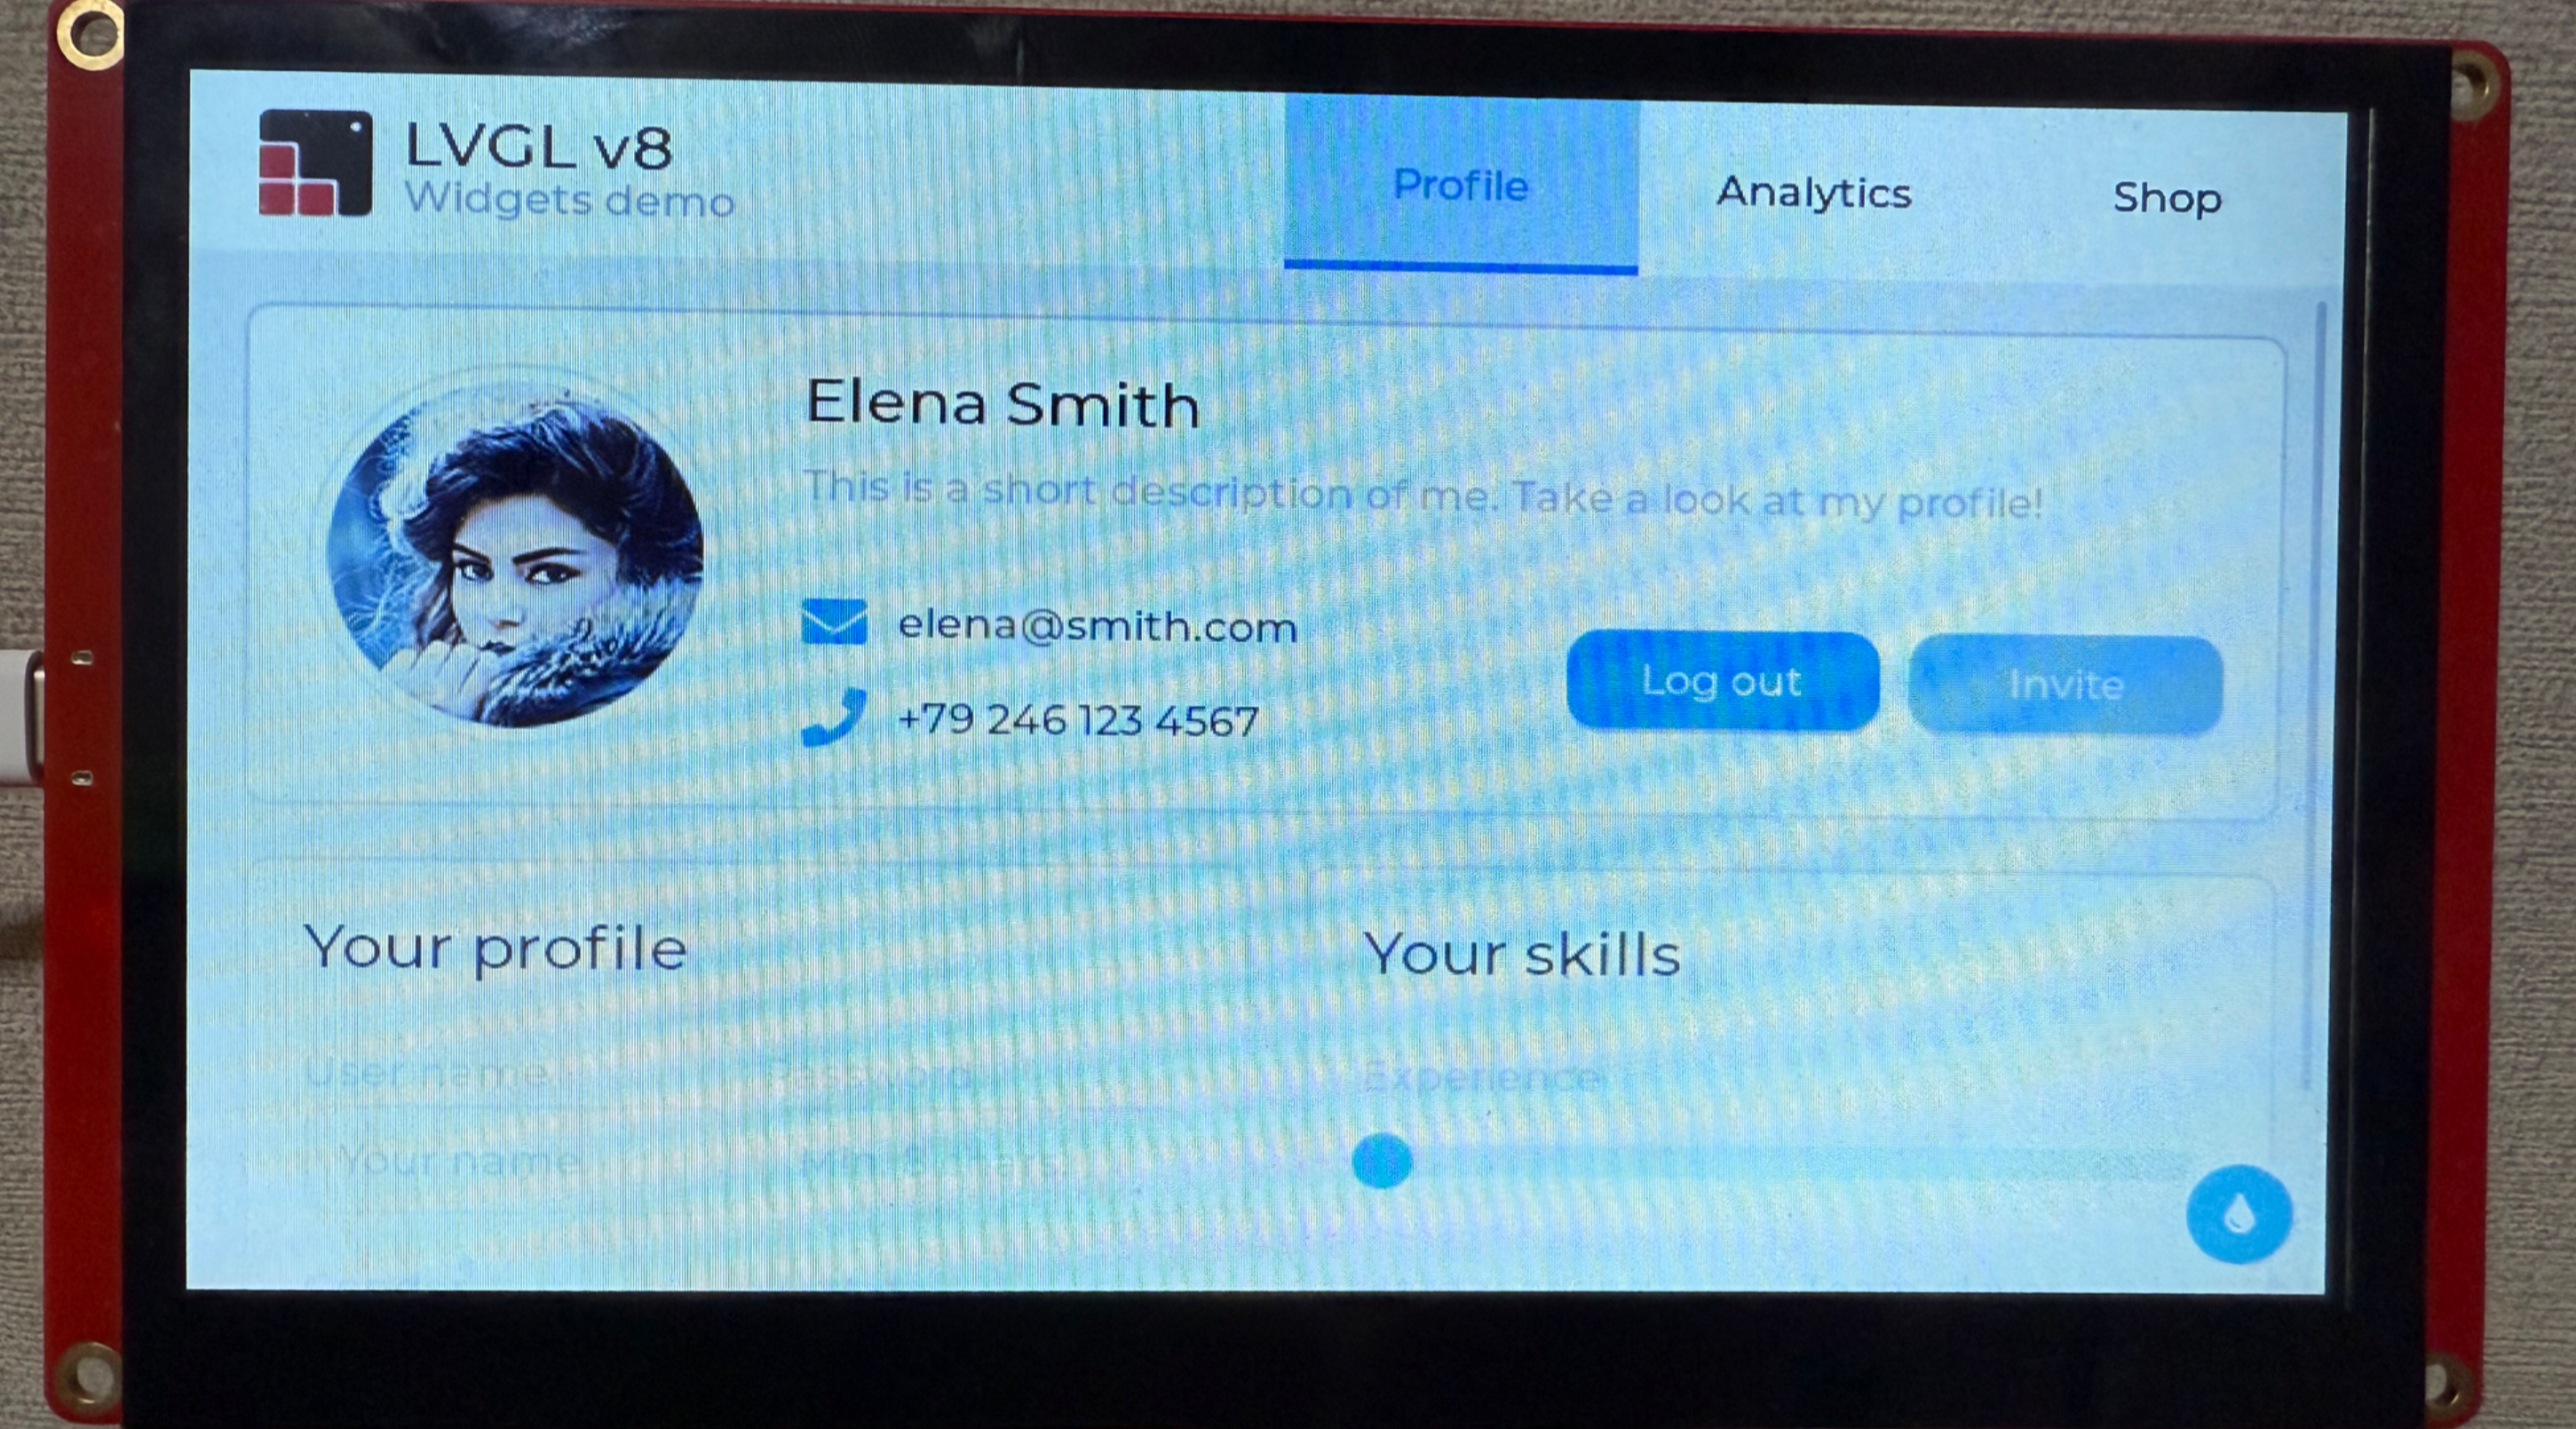
다음 빌드한 다음 crowpanel에 펌웨어를 업로드 하면 정상적으로 동작합니다.
'Embedded > ESP32' 카테고리의 다른 글
| [ESP32] 아두이노IDE로 업로드시 No serial data received 애러 해결 (0) | 2025.03.20 |
|---|---|
| [LOLIN D32 PRO] Wrong boot mode detected 문제 해결 (0) | 2025.03.07 |


